awe-108 Scheduler module
The scheduler module lets AWE launch work on a schedule, run task workflows, and report the results. This page keeps the practical path front and center: enable the module, create a task, choose a launch mode, and only then move into advanced scheduling, dependencies, servers, and calendars.
Quick path
- Add the scheduler starter and module configuration.
- Apply the required database migration modules.
- Add the scheduler menu entries.
- Create a task with the wizard.
- Choose manual, scheduled, or file-based launch.
- Add dependencies, servers, and calendars only when the basic flow already works.
Before you start
You should already be comfortable with:
If you need the exhaustive scheduler field matrix, use the dedicated guides after this tutorial pass:
Step 1: Enable the scheduler module
Add the starter dependency:
<dependency>
  <groupId>com.almis.awe</groupId>
  <artifactId>awe-scheduler-spring-boot-starter</artifactId>
</dependency>
Enable the module list entry in your generated app application.properties by adding awe-scheduler to your existing module list:
# Keep the rest of the list aligned with your application.
# The required scheduler addition is awe-scheduler.
awe.application.module-list=<your-existing-modules>,awe-scheduler
For example, generated Angular apps usually start from <your-app>,awe, while generated React apps include awe-react as well. Modules such as awe-tools are optional and only belong in this list when your application actually uses them.
Enable the related database migrations:
# Enable database update by Flyway
spring.flyway.enabled=true
awe.database.migration-modules=AWE,SCHEDULER,[YOUR_APP]
Add the scheduler menu entries:
<menu screen="home_horizontal" xmlns:xsi="http://www.w3.org/2001/XMLSchema-instance" xsi:noNamespaceSchemaLocation="https://aweframework.gitlab.io/awe/docs/schemas/menu.xsd" context="screen/private/home" default-action="screen">
  <option name="scheduler" label="MENU_SCHEDULER" icon="clock-o">
    <option name="scheduler-management" label="MENU_SCHEDULER_MANAGEMENT" screen="scheduler-management" icon="cogs"/>
    <option name="scheduler-tasks" label="MENU_SCHEDULER_TASKS" screen="scheduler-tasks" icon="tasks">
      <option name="new-scheduler-task" screen="new-scheduler-task" invisible="true" />
      <option name="update-scheduler-task" screen="update-scheduler-task" invisible="true" />
    </option>
    <option name="scheduler-servers" label="MENU_SCHEDULER_SERVERS" screen="scheduler-server" icon="server">
      <option name="new-scheduler-server" screen="new-scheduler-server" invisible="true" />
      <option name="update-scheduler-server" screen="update-scheduler-server" invisible="true" />
    </option>
    <option name="scheduler-calendars" label="MENU_SCHEDULER_CALENDARS" screen="scheduler-calendars" icon="calendar">
      <option name="new-scheduler-calendar" screen="new-scheduler-calendar" invisible="true" />
      <option name="update-scheduler-calendar" screen="update-scheduler-calendar" invisible="true" />
    </option>
  </option>
</menu>
Optional scheduler properties
If you need to change runtime behavior, override the scheduler properties in your configuration.
#################################################
# Scheduler properties
#################################################
scheduler.tasks.load.on.start=true
scheduler.tasks.wait.on.stop=true
scheduler.stored.executions=5

#################################################
# Scheduler thread pool properties
#################################################
scheduler.task-pool.size=20
scheduler.task-pool.max-size=50
scheduler.task-pool.queue-size=1000
scheduler.task-pool.termination-seconds=120

#################################################
# Scheduler log
#################################################
scheduler.execution.log.path=${application.log.base.path}/scheduler/

#################################################
# Scheduler reporting
#################################################
scheduler.report.email.from.value=scheduler@almis.com
If you enable clustered execution, all participating instances must coordinate through the configured datasource.
Do not run clustered scheduling across machines with unsynchronized clocks. Quartz-based coordination depends on time being consistent enough across the participating nodes.
For deeper Quartz storage details and job store setup, use the official Quartz documentation.
Step 2: Understand the scheduler model
A scheduler task is a job plus its launch configuration.
In practice, you will work with:
- tasks: what to execute and when
- dependencies: what should run after a task finishes
- servers: where command or file-based work executes
- calendars: dates that should be ignored by schedules
Task types:
| Task type | Purpose |
|---|---|
| Maintain task | Executes a public maintain with a defined schedule. |
| Command task | Executes a command on the selected server with the defined schedule. |
Step 3: Create a task with the wizard
The task wizard is the main entry point for scheduler usage.
1. Basic task information
This step defines the task identity and execution type.
| Element | Definition | Use |
|---|---|---|
| Name | Task name | Required |
| Active | Task status | Required |
| Description | Task description | Optional |
| Max. stored executions | Number of stored executions used for statistics | Optional |
| Timeout | Maximum execution time in milliseconds | Optional |
| Execute | Command or Maintain | Required |
| Execute at | Server used for command execution | Optional for command tasks |
| Command | Command to launch | Required for command tasks |
| Maintain | Maintain to launch | Required for maintain tasks |
| Launch dependencies in case of warning | Whether dependent tasks can continue on warning | Optional |
| Launch dependencies in case of error | Whether dependent tasks can continue on error | Optional |
| Set execution as warning in case of error | Converts parent execution to warning on dependency error | Optional |
To expose a maintain to the scheduler, the maintain must be declared with public="true".
2. Task parameters
This step defines the execution context passed to the selected maintain or command.
| Element | Definition | Use |
|---|---|---|
| Name | Parameter name | Required |
| Source | Where the value comes from | Required |
| Type | Parameter type shown to the user | Required |
| Value | Literal value or referenced variable name | Optional |
For maintain tasks, the required maintain parameters are usually added automatically.
3. Task launch mode
You can choose one of three launch styles:
Manual
The task runs only when launched manually from the task list.
This is also the mode required when a task will be used as a dependency target.
Scheduled
The task runs using a schedule configuration.
Use this tutorial for orientation, then move to the schedule configuration guide for the full schedule options.
File
The scheduler periodically checks files and launches work based on the configured file criteria.
Typical fields:
| Element | Definition | Use |
|---|---|---|
| Search at | Server where the file check happens | Required |
| File path | Location of the files | Required |
| File pattern | Pattern the files must match | Required |
| User | FTP user if required | Optional |
| Password | FTP password if required | Optional |
4. Task dependencies
Dependencies let you turn isolated tasks into a workflow.
| Element | Definition | Use |
|---|---|---|
| Task | Task to be executed after the current one | Required |
| Blocking | Whether it is synchronous and can stop the dependency stack on error | Required |
| Order | Launch order for blocking dependencies | Required |
Go deeper with the dependencies guide.
5. Task report
The final step configures what happens after the task finishes.
Available report modes:
- None: no report
- Email: send execution information by email
- Broadcast: send a broadcast message to selected users
- Maintain: run a maintain as the reporting action
Email example fields:
| Element | Definition | Use |
|---|---|---|
| Send in case of | Allowed final statuses for sending the email | Required |
| Email server | Sender configuration | Required |
| Send to users | Destination users | Required |
| Title | Email title | Required |
| Message | Email message | Required |
Step 4: Choose the right schedule depth
For most first uses, you only need to pick the launch model correctly.
Repetitive schedules
Use these when the task should run every X seconds, minutes, hours, days, months, or years.
Common shared fields include:
- calendar
- from / to
- repeat each
The exact field combinations depend on the chosen unit, so use the schedule configuration guide when you need the full matrix.
One-time schedules
Use these when the task should run once at a specific date/time.
Custom schedules
Use these when Quartz-level control is necessary. This is the most flexible option, but it is also the least tutorial-friendly one, so prefer the dedicated schedule guide when you reach this level.
Step 5: Add dependencies when the task flow is stable
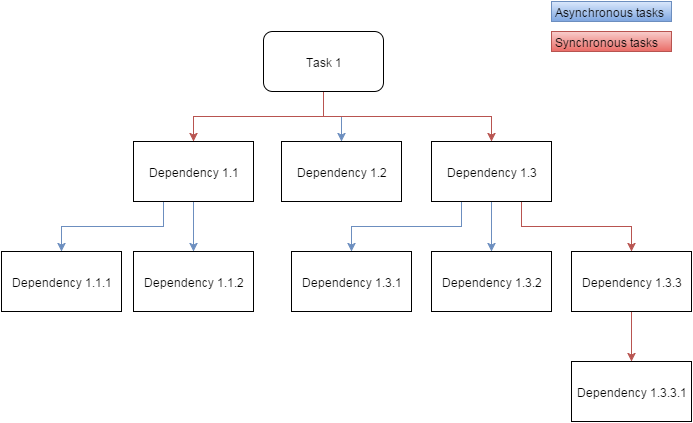
Dependencies let one task launch other tasks after it finishes.
Two practical modes matter most:
Synchronous dependencies
- configured with
Blocking = Yes - run in a configurable order
- can stop the dependency stack if one task fails
Asynchronous dependencies
- non-blocking
- launched in bulk
- execution order is not configured the same way
Important rule: a task must use Manual launch mode before it can be selected as a dependency target.
Step 6: Configure servers and calendars only when needed
Servers
Servers are mainly used for command execution and file-based task checks.
Core fields:
| Element | Definition | Use |
|---|---|---|
| Name | Server name | Required |
| Server | Server address | Required |
| Port | Server port | Required |
| Type of connection | Protocol used to connect | Required |
| Active | Server status | Required |
If a server is inactive, tasks depending on it will not use it.
Calendars
Calendars define dates that the scheduler should ignore.
Basic calendar fields:
| Element | Definition | Use |
|---|---|---|
| Name | Calendar name | Required |
| Description | Calendar description | Required |
| Active | Calendar status | Required |
Calendar date entries typically require:
| Element | Definition | Use |
|---|---|---|
| Date | Ignored date | Required |
| Name | Human-readable name for the date | Optional |
Each task can be associated with one calendar.
What to do next
- Use the schedule configuration guide when you need detailed cron-style setup.
- Use the dependencies guide when building task workflows.
- Use awe-104 if the maintain tasks behind your scheduler flows still need to be defined.