Introducción
The scheduler module allows you to launch scheduled jobs via shell commands or Data retrieval and manipulation methods.
For a quick start on how to use the scheduler module look at the Scheduler guide.
Prerequisites
The scheduler module needs to be configure before it is used.
To use this module, you must follow the next steps:
- Add scheduler dependencies to
pom.xmlfile.
<!-- Scheduler starter-->
<dependency>
  <groupId>com.almis.awe</groupId>
  <artifactId>awe-scheduler-spring-boot-starter</artifactId>
</dependency>
- Add scheduler module to
library.propertiesfile.
# Utilities list
modules.list=app,scheduler,tools,awe
module.awe=awe
module.tools=awe-tools
module.scheduler=awe-scheduler
- Add scheduler SQL tables to flyway
# Enable database update by Flyway
spring.flyway.enabled=true
awe.database.migration-modules=AWE,SCHEDULER,[YOUR_APP]
- Add scheduler menu options to
private.xmlorpublic.xmlfile.
<?xml version="1.0" encoding="UTF-8"?>
<menu screen="home_horizontal" xmlns:xsi="http://www.w3.org/2001/XMLSchema-instance" xsi:noNamespaceSchemaLocation="https://aweframework.gitlab.io/awe/docs/schemas/menu.xsd" context="screen/private/home" default-action="screen">
 <option name="scheduler" label="MENU_SCHEDULER" icon="clock-o">
    <option name="scheduler-management" label="MENU_SCHEDULER_MANAGEMENT" screen="scheduler-management" icon="cogs"/>
    <option name="scheduler-tasks" label="MENU_SCHEDULER_TASKS" screen="scheduler-tasks" icon="tasks">
      <option name="new-scheduler-task" screen="new-scheduler-task" invisible="true" />
      <option name="update-scheduler-task" screen="update-scheduler-task" invisible="true" />
    </option>
    <option name="scheduler-servers" label="MENU_SCHEDULER_SERVERS" screen="scheduler-server" icon="server">
      <option name="new-scheduler-server" screen="new-scheduler-server" invisible="true" />
      <option name="update-scheduler-server" screen="update-scheduler-server" invisible="true" />
    </option>
    <option name="scheduler-calendars" label="MENU_SCHEDULER_CALENDARS" screen="scheduler-calendars" icon="calendar">
      <option name="new-scheduler-calendar" screen="new-scheduler-calendar" invisible="true" />
      <option name="update-scheduler-calendar" screen="update-scheduler-calendar" invisible="true" />
    </option>
  </option>
...
</menu>
If the Scheduler needs to work in a cluster or change any schedule config, we can overwrite properties of scheduler.properties file.
#################################################
 # Scheduler properties
 ################################################
 scheduler.tasks.load.on.start=true
 scheduler.tasks.wait.on.stop=true
 scheduler.stored.executions=5

 ################################################
 # Scheduler thread pool properties
 ################################################
 scheduler.task-pool.size=20
 scheduler.task-pool.max-size=50
 scheduler.task-pool.queue-size=1000
 scheduler.task-pool.termination-seconds=120

 ################################################
 # Scheduler log
 ################################################
 scheduler.execution.log.path=${application.log.base.path}/scheduler/

 ################################################
 # Scheduler reporting
 ################################################
 scheduler.report.email.from.value=scheduler@almis.com
By allowing the clustering, the scheduler instances will use the configured datasource to synchronize the job execution between them.
Note: Never run clustering on separate machines, unless their clocks are synchronized using some form of time-sync service (daemon) that runs very regularly (the clocks must be within a second of each other).
The Quartz library needs some tables in order to work correctly depending on the configuration it is used.
To know more about the different kinf of jobStores to be used in the configuration, see the Quartz documentation.
The tables to be applied to the different kind of databases can be found by downloading quartz framework, under docs / dbTables folder.
Scheduler Guide
This document gives a minimum base to start with the AWE Scheduler module, and explains how to automate and schedule tasks inside AWE in a simple way.
The Scheduler module is based on the Quartz Scheduler library.
All documentation related to the Quartz Scheduler library can be found on its web page.
Tasks
A task consists on a job associated to a trigger that is executed by the Scheduler in the configured time / moment.
A task can also be concatenated with other tasks to create a workflow. This can be done by adding those other tasks as dependencies in the parent task configuration wizard.
Task types
There are two type of tasks that the scheduler can work with, the maintain tasks and the command tasks.
| Maintain Task | Command Task |
|---|---|
| A maintain task executes a public maintain with a defined schedule. | A command task executes a batch on the selected server with the defined schedule. |
Task configuration
When creating a new task, a task creation wizard is used to personalize the task configuration.
The configuration wizard consists in 5 steps:
1. Basic task information
In this step we have to add the task basic configuration.
| Elemento | Definition | Uso |
|---|---|---|
| Name | Task name | Obligatorio |
| Active | Task status, if not active the task would not be launched | Obligatorio |
| Descripción | Task description | Opcional |
| Max. stored executions | Maximum number of executions to be stored in the database (Used to calculate the average time). The default value is 10. | Opcional |
| Timeout | Maximum time for the task to finish. If the task execution time exceeds the timeout time (represented in milliseconds) the task will be interrupted | Opcional |
| Execute | The task execution type (Command or Maintain) | Obligatorio |
| Execute at | Server in which the command task has to be launched | Optional (Only needed in Command launch type) |
| Command | Command to launch | Required (Only needed in Command launch type) |
| Maintain | Maintain to launch | Required (Only needed in Maintain launch type) |
| Launch dependencies in case of warning | Launch the task dependencies in case of warning | Opcional |
| Launch dependencies in case of error | Launch the task dependencies in case of error | Opcional |
| Set execution as warning in case of error | Sets the parent execution as warning in case of dependency error | Opcional |
Note: To add a new maintain to the Scheduler, the maintain must be set to
public="true".
2. Task parameters
This step allows to add the needed parameters to the maintain or command for its execution.
These parameters are loaded to the application context when the task is going to be executed. In this way, the task can get the parameters in the execution time.
| Elemento | Definition | Uso |
|---|---|---|
| Name | Parameter name | Obligatorio |
| Source | Parameter source, the place from which the parameter will take its value | Obligatorio |
| Tipo | The parameter type (Only used to give extra information to the user) | Obligatorio |
| Value | The parameter value, it can be directly the parameter value if the source is Value, or the parameter name to take the value from if the source is Variable | Opcional |
Note: If the task launch type is
Maintain, the needed parameters for the selected maintain will be automatically added to the task parameters screen.
3. Task launch
In this step we will configure the launch type for the task.
We can choose from three different options:
1. Manual
The task will only be launched manually from the task list screen.
Note: For a task to be added as a dependency, the launch type must be set to
Manual.
2. Scheduled
The task will be launched with a cron pattern based schedule.
See schedule prerequisites for more information about how to create schedules for a task.
3. File
With this launch type, the task will launch a check in the selected file/s with the configured schedule.
To know how to create a schedule for the task see schedule configuration guide.
The remaining fields are:
| Elemento | Definition | Uso |
|---|---|---|
| Search at | The server in which the scheduler has to check for the files | Obligatorio |
| File path | The path in which the file/s are located | Obligatorio |
| File pattern | The pattern that the files have to match with | Obligatorio |
| User | The user for the FTP connection | Opcional |
| Password | The password for the FTP connection | Opcional |
4. Task dependencies
In this step we will configure which tasks have to be executed after the current task finishes.
Playing with these options, we can create a workflow.
| Elemento | Definition | Uso |
|---|---|---|
| Task | The task to be executed | Obligatorio |
| Blocking | Defines if the task is blocking or not. If it is, the task will be executed synchronously, and it will cancel the dependency launch stack if the task ends with an error. Otherwise, the dependency will be launched asynchronously | Obligatorio |
| Order | The order in which the synchronous task has to be launched in the synchronous dependency stack, the asynchronous dependencies will be launched as they come, with no defined order | Obligatorio |
Go to the dependencies guide to see more about dependencies and their usage.
Note: The dependencies can also have their own dependencies to create a workflow.
5. Task report
The last step is to choose a report type.
The report will give information about the task when it finishes.
We can choose one of these four options:
1. None
Used when we don't want to retrieve any report from the task.
This could be compared to the silent-action in AWE.
2. Email
This option will send an email with the task information, and it will also add the dependencies information if any.
| Elemento | Definition | Uso |
|---|---|---|
| Send in case of | Set the allowed status (task status when it finishes) for sending the email | Obligatorio |
| Email server | The email server form where the email is going to be sent | Obligatorio |
| Send to users | The list of users to send the email | Obligatorio |
| Title | The title of the email | Obligatorio |
| Mensaje | The message to be added in the email | Obligatorio |
Note: The email will also add basic information about the task itself and its dependencies.
3. Broadcast
This option will send a broadcast message with the given message to the selected users only.
| Elemento | Definition | Uso |
|---|---|---|
| Send in case of | Set the allowed status (task status when it finishes) for sending the broadcast | Obligatorio |
| Send to users | The list of users to send the broadcast | Obligatorio |
| Mensaje | The message to be sent in the broadcast | Obligatorio |
4. Maintain
This option will launch the selected maintain as a report.
| Elemento | Definition | Uso |
|---|---|---|
| Send in case of | Set the allowed status (task status when it finishes) for executing the maintain | Obligatorio |
| Mensaje | The message to be sent, it will be added to the context in order to be available for the selected maintain | Opcional |
Note: The task data will be added to the context in order to be available for the selected maintain, to get the data, it is recommended to use the TaskConstants interface variable names from the Scheduler package.
Task management
The existing tasks can be managed from the scheduler tasks screen, where we will have a list of the created tasks.
The list will show some basic information of each task, like the name, the launch type (icon), the last and next execution times, the task status and the execution average time.
When selecting one task, some options will be activated:
| Option | Definition | Multiple |
|---|---|---|
| Update | Update the selected task | No |
| Delete | Delete the selected task/s | Si |
| Start | Launch the selected task as a manual task. It doesn't need to be a manual task in order to launch an instance of the task manually | No |
| Activate/Deactivate | Activates or Deactivates the selected task, the option changes depending on the current task status | No |
Task Schedule Configuration
One of the main features of the scheduler, is the powerful tool that allows to create any kind of schedule in a simple way.
For this purpose, and with the simplicity in mind, the schedule creation has been separated into three main schedule options:
1. Repetitive schedules
Schedules that are launched every X time. We can choose the time that has to pass between launches, and the time unit that is going to be used.
The repetitive schedule, as its name suggest, allows to create schedules that are launched every X time, where X is the time between one launch to the next one.
Depending on the time unit we choose, some other options will appear into the configuration screen to help the user to create a more advance schedule.
But first, the next fields are common for all the possible options.
| Option | Definition | Uso | Disables |
|---|---|---|---|
| Calendar | A holiday calendar to use for the current task, the task won't be launched in the dates contained by the calendar | Opcional | Execution date |
| From ^1 | The start date / time for the current task schedule | Opcional | None |
| To ^2 | The end date / time for the current task schedule | Opcional | None |
| Repeat each | The time that has to pass between executions | Obligatorio | None |
^1: If the From criterion is empty, the task will be launched at the moment it's created.
^2: If the To criterion is empty, the task will be launched indefinitely until its configuration changes, or the task is removed.
1. Seconds
| Option | Definition | Uso | Disables |
|---|---|---|---|
| Months | The months that the schedule will be launch. | Opcional | None |
| Days | The days of the month that the schedule will be launch. | Opcional | Days of the week |
| Days of the week | The days of the week that the schedule will be launch. | Opcional | Days |
| Hours | The hours where the schedule will be launch. | Opcional | None |
| Minutes | The minutes where the schedule will be launch. | Opcional | None |
2. Minutes
| Option | Definition | Uso | Disables |
|---|---|---|---|
| Months | The months that the schedule will be launch. | Opcional | None |
| Days | The days of the month that the schedule will be launch. | Opcional | Days of the week |
| Days of the week | The days of the week that the schedule will be launch. | Opcional | Days |
| Hours | The hours where the schedule will be launch. | Opcional | None |
3. Hours
| Option | Definition | Uso | Disables |
|---|---|---|---|
| Months | The months that the schedule will be launch. | Opcional | None |
| Days | The days of the month that the schedule will be launch. | Opcional | Days of the week |
| Days of the week | The days of the week that the schedule will be launch. | Opcional | Days |
4. Days
| Option | Definition | Uso | Disables |
|---|---|---|---|
| Months | The months that the schedule will be launch. | Opcional | None |
| Hours | The hours where the schedule will be launch. | Opcional | Execution time |
| Minutes | The minutes where the schedule will be launch. | Opcional | Execution time |
| Seconds | The seconds where the schedule will be launch. | Opcional | Execution time |
| Execution time | The time where the schedule will be launch. | Opcional | Hours,Minutes,Seconds |
5. Months
| Option | Definition | Uso | Disables |
|---|---|---|---|
| Days | The days of the month that the schedule will be launch. | Opcional | Days of the week |
| Days of the week | The days of the week that the schedule will be launch. | Opcional | Days |
| Hours | The hours where the schedule will be launch. | Opcional | Execution time |
| Minutes | The minutes where the schedule will be launch. | Opcional | Execution time |
| Seconds | The seconds where the schedule will be launch. | Opcional | Execution time |
| Execution time | The time where the schedule will be launch. | Opcional | Hours,Minutes,Seconds |
6. Years
| Option | Definition | Uso | Disables |
|---|---|---|---|
| Months | The months that the schedule will be launch. | Opcional | None |
| Days | The days of the month that the schedule will be launch. | Opcional | Days of the week |
| Days of the week | The days of the week that the schedule will be launch. | Opcional | Days |
| Hours | The hours where the schedule will be launch. | Opcional | Execution time |
| Minutes | The minutes where the schedule will be launch. | Opcional | Execution time |
| Seconds | The seconds where the schedule will be launch. | Opcional | Execution time |
| Execution time | The time where the schedule will be launch. | Opcional | Hours,Minutes,Seconds |
Note: If one of the optional values inside the configuration is left empty, the default
Allvalue will be applied.
2. One time Schedules
This kind of schedule will launch a task just once.
See more about one time schedules here.
3. Custom schedules
The custom schedule allows to create every possible configuration that the Quartz Scheduler can work with. The custom schedule configuration screen uses dependencies in order to help the user with the correct creation of the schedule by enabling / disabling criterions when needed.
This schedule type launches a task only once, by creating a cron pattern with an specific date and time.
The available fields to create this kind of task are:
| Option | Definition | Uso | Disables |
|---|---|---|---|
| Execution date | The launch date. | Obligatorio | None |
| Execution time | The launch time. | Obligatorio | None |
Note: At least one of the two criterions needs to be filled.
The custom schedule offers all the available fields that can be customized to create the cron pattern.
| Option | Definition | Uso | Disables |
|---|---|---|---|
| Calendar | A holiday calendar to use for the current task, the task won't be launched in the dates contained by the calendar | Opcional | Execution date |
| From ^1 | The start date / time for the current task schedule | Opcional | Execution date,Execution time |
| To ^2 | The end date / time for the current task schedule | Opcional | Execution date,Execution time |
| Years | The years that the schedule will be launch. | Opcional | Execution date |
| Months | The months that the schedule will be launch. | Opcional | Execution date |
| Days | The days of the month that the schedule will be launch. | Opcional | Execution date,Days of the week |
| Days of the week | The days of the week that the schedule will be launch. | Opcional | Execution date,Days |
| Hours | The hours where the schedule will be launch. | Opcional | Execution time |
| Minutes | The minutes where the schedule will be launch. | Opcional | Execution time |
| Seconds | The seconds where the schedule will be launch. | Opcional | Execution time |
| Execution date | The date where the schedule will be launch. | Opcional | Calendar,From,To,Years,Months,Days,Days of the week |
| Execution time | The time where the schedule will be launch. | Opcional | Hours,Minutes,Seconds |
^1: If the From criterion is empty, the task will be launched at the moment it's created.
^2: If the To criterion is empty, the task will be launched indefinitely until its configuration changes, or the task is removed.
Task Dependencies
Another powerful feature of the Scheduler module is the possibility of adding dependencies to a task. The dependencies are tasks that will be launched just after the parent task finishes. These dependencies can also contain other dependencies, creating a workflow.
There are two main types of dependencies.
1. Synchronous dependencies
The synchronous dependencies are, as their name suggest, executed in a synchronous way, in a configurable order.
The synchronous dependencies are created by setting the Blocking=Yes option.
By setting blocking to yes mean that, in case that any of the dependencies ends with an error, it will cancel the entire synchronous execution stack.
To manage the stack, there is the Order criterion, which is used to set the order in which the synchronous dependencies are going to be executed.
2. Asynchronous dependencies
The asynchronous dependencies are executed in bulk and their execution order can't be configured.
As the dependencies are executed in bulk, they are not blocking between them.
Dependencies configuration
The dependency configuration scree allows to create two type of dependencies, synchronous and asynchronous.
The difference between them is just that one is blocking whereas the other is not.
In order to add a task as a dependency, its launch type must be set to Manual.
| Elemento | Definition | Uso |
|---|---|---|
| Task | The task that the dependency is going to execute | Obligatorio |
| Blocking | Used to define if the dependency is going to be synchronous or asynchronous, and if it can cancel the synchronous dependencies execution stack | Obligatorio |
| Order | Synchronous dependency execution order, only needed if the Blocking option is set to Yes, otherwise it will be disabled | Obligatorio |
Workflows
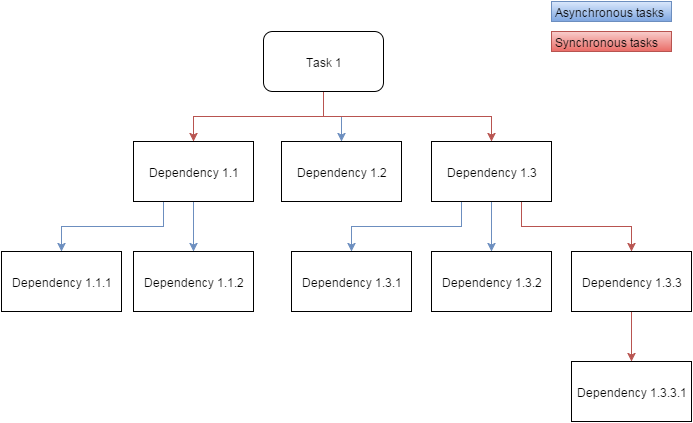
The next image shows an example on how to create a workflow using the scheduler dependencies concatenation.
Servers
The servers created for the Scheduler module are mainly used to execute tasks, and in tasks that needs to check if a file has changed.
The servers can be instantiated multiple times, and each instantiation can use its own user and password to connect to the server with the selected protocol.
Server configuration
When creating a new server, the next fields have to be filled.
| Elemento | Definition | Uso |
|---|---|---|
| Name | Server name | Obligatorio |
| Server | Server IP address | Obligatorio |
| Port | Server port | Obligatorio |
| Type of connection | The protocol to be used to connect to the server | Obligatorio |
| Active | Server status | Obligatorio |
Note: If a server is deactivated, the task using it won't even try to connect to it.
Server management
The scheduler server list will show a list of server with their basic information: name, server ip, connection protocol and status.
When selecting one of the servers from the list, some options will be enabled:
| Option | Definition | Multiple |
|---|---|---|
| Update | Update the selected server | No |
| Delete | Deletes the selected server/s | Si |
| Activate / Deactivate | Activates / deactivates the selected server, the label changes depending on the selected servers current status | No |
Calendars
The task inside the scheduler can be modified to ignore some dates by using holiday calendars.
Those calendars contains the dates that have to be ignored by the scheduler in the task schedule.
Each of the tasks can only be associated with one calendar.
Calendar configuration
The calendar configuration procedure consists in two steps:
1. Create calendar
The first step is to create the calendar itself, which will have the next basic information.
| Elemento | Definition | Uso |
|---|---|---|
| Name | The calendar name | Obligatorio |
| Descripción | The calendar description | Obligatorio |
| Active | The calendar status | Obligatorio |
Note: If the calendar status is set to
Active = Nothe task will ignore the calendar, and it will be launch as if it wasn't associated with it.
2. Add dates
Once the calendar is created, from the calendar configuration screen, we can add new dates by selecting the option edit on the top right side of the screen.
When we get to the edition screen we will have to fill the next fields for each date.
| Elemento | Definition | Uso |
|---|---|---|
| Date | The date to add to the calendar | Obligatorio |
| Name | A name to assign to the date, for example, a holiday name | Opcional |
Calendar management
On the calendar list screen, when selecting one of them, the next options will be available:
| Option | Definition | Multiple |
|---|---|---|
| Edit | Redirects to the edition screen where we can change the calendar data, and add/remove/update calendar dates | No |
| Delete | Delete calendar and all its associated dates | Si |
| Activate/Deactivate | Activates / deactivates the selected calendar, the label changes depending on the selected calendars current status | No |