Version: Next

Introduction


The scheduler module allows you to launch scheduled jobs via shell commands or Data retrieval and manipulation methods.

For a quick start on how to use the scheduler module look at the Scheduler guide.


Prerequisites


The scheduler module needs to be configure before it is used.

To use this module, you must follow the next steps:

  • Add scheduler dependencies to pom.xml file.
pom.xml
<!-- Scheduler starter-->
<dependency>
<groupId>com.almis.awe</groupId>
<artifactId>awe-scheduler-spring-boot-starter</artifactId>
</dependency>
  • Add scheduler module to library.properties file.
config/library.properties
# Utilities list
awe.application.module-list=app,awe-scheduler,awe-tools,awe
  • Add scheduler SQL tables to flyway
application.properties
# Enable database update by Flyway
spring.flyway.enabled=true
awe.database.migration-modules=AWE,SCHEDULER,[YOUR_APP]
  • Add scheduler menu options to private.xml or public.xml file.
<?xml version="1.0" encoding="UTF-8"?>
<menu screen="home_horizontal" xmlns:xsi="http://www.w3.org/2001/XMLSchema-instance" xsi:noNamespaceSchemaLocation="https://aweframework.gitlab.io/awe/docs/schemas/menu.xsd" context="screen/private/home" default-action="screen">
<option name="scheduler" label="MENU_SCHEDULER" icon="clock-o">
<option name="scheduler-management" label="MENU_SCHEDULER_MANAGEMENT" screen="scheduler-management" icon="cogs"/>
<option name="scheduler-tasks" label="MENU_SCHEDULER_TASKS" screen="scheduler-tasks" icon="tasks">
<option name="new-scheduler-task" screen="new-scheduler-task" invisible="true" />
<option name="update-scheduler-task" screen="update-scheduler-task" invisible="true" />
</option>
<option name="scheduler-servers" label="MENU_SCHEDULER_SERVERS" screen="scheduler-server" icon="server">
<option name="new-scheduler-server" screen="new-scheduler-server" invisible="true" />
<option name="update-scheduler-server" screen="update-scheduler-server" invisible="true" />
</option>
<option name="scheduler-calendars" label="MENU_SCHEDULER_CALENDARS" screen="scheduler-calendars" icon="calendar">
<option name="new-scheduler-calendar" screen="new-scheduler-calendar" invisible="true" />
<option name="update-scheduler-calendar" screen="update-scheduler-calendar" invisible="true" />
</option>
</option>
...
</menu>

If the Scheduler needs to work in a cluster or change any schedule config, we can overwrite properties of scheduler.properties file.

#################################################
# Scheduler properties
################################################
scheduler.tasks.load.on.start=true
scheduler.tasks.wait.on.stop=true
scheduler.stored.executions=5

################################################
# Scheduler thread pool properties
################################################
scheduler.task-pool.size=20
scheduler.task-pool.max-size=50
scheduler.task-pool.queue-size=1000
scheduler.task-pool.termination-seconds=120

################################################
# Scheduler log
################################################
scheduler.execution.log.path=${application.log.base.path}/scheduler/

################################################
# Scheduler reporting
################################################
scheduler.report.email.from.value=scheduler@almis.com

By allowing the clustering, the scheduler instances will use the configured datasource to synchronize the job execution between them.

Note: Never run clustering on separate machines, unless their clocks are synchronized using some form of time-sync service (daemon) that runs very regularly (the clocks must be within a second of each other).

The Quartz library needs some tables in order to work correctly depending on the configuration it is used.

To know more about the different kinf of jobStores to be used in the configuration, see the Quartz documentation.

The tables to be applied to the different kind of databases can be found by downloading quartz framework, under docs / dbTables folder.


Scheduler Guide


This document gives a minimum base to start with the AWE Scheduler module, and explains how to automate and schedule tasks inside AWE in a simple way.

The Scheduler module is based on the Quartz Scheduler library.

All documentation related to the Quartz Scheduler library can be found on its web page.


Tasks


A task consists on a job associated to a trigger that is executed by the Scheduler in the configured time / moment.

A task can also be concatenated with other tasks to create a workflow. This can be done by adding those other tasks as dependencies in the parent task configuration wizard.

Task types

There are two type of tasks that the scheduler can work with, the maintain tasks and the command tasks.

Maintain TaskCommand Task
A maintain task executes a public maintain with a defined schedule.A command task executes a batch on the selected server with the defined schedule.

Task configuration

When creating a new task, a task creation wizard is used to personalize the task configuration.

The configuration wizard consists in 5 steps:

1. Basic task information

In this step we have to add the task basic configuration.

ElementDefinitionUse
NameTask nameRequired
ActiveTask status, if not active the task would not be launchedRequired
DescriptionTask descriptionOptional
Max. stored executionsMaximum number of executions to be stored in the database (Used to calculate the average time). The default value is 10.Optional
TimeoutMaximum time for the task to finish. If the task execution time exceeds the timeout time (represented in milliseconds) the task will be interruptedOptional
ExecuteThe task execution type (Command or Maintain)Required
Execute atServer in which the command task has to be launchedOptional (Only needed in Command launch type)
CommandCommand to launchRequired (Only needed in Command launch type)
MaintainMaintain to launchRequired (Only needed in Maintain launch type)
Launch dependencies in case of warningLaunch the task dependencies in case of warningOptional
Launch dependencies in case of errorLaunch the task dependencies in case of errorOptional
Set execution as warning in case of errorSets the parent execution as warning in case of dependency errorOptional

Note: To add a new maintain to the Scheduler, the maintain must be set to public="true".

2. Task parameters

This step allows to add the needed parameters to the maintain or command for its execution.

These parameters are loaded to the application context when the task is going to be executed. In this way, the task can get the parameters in the execution time.

ElementDefinitionUse
NameParameter nameRequired
SourceParameter source, the place from which the parameter will take its valueRequired
TypeThe parameter type (Only used to give extra information to the user)Required
ValueThe parameter value, it can be directly the parameter value if the source is Value, or the parameter name to take the value from if the source is VariableOptional

Note: If the task launch type is Maintain, the needed parameters for the selected maintain will be automatically added to the task parameters screen.

3. Task launch

In this step we will configure the launch type for the task.

We can choose from three different options:

1. Manual

The task will only be launched manually from the task list screen.

Note: For a task to be added as a dependency, the launch type must be set to Manual.

2. Scheduled

The task will be launched with a cron pattern based schedule.

See schedule prerequisites for more information about how to create schedules for a task.

3. File

With this launch type, the task will launch a check in the selected file/s with the configured schedule.

To know how to create a schedule for the task see schedule configuration guide.

The remaining fields are:

ElementDefinitionUse
Search atThe server in which the scheduler has to check for the filesRequired
File pathThe path in which the file/s are locatedRequired
File patternThe pattern that the files have to match withRequired
UserThe user for the FTP connectionOptional
PasswordThe password for the FTP connectionOptional

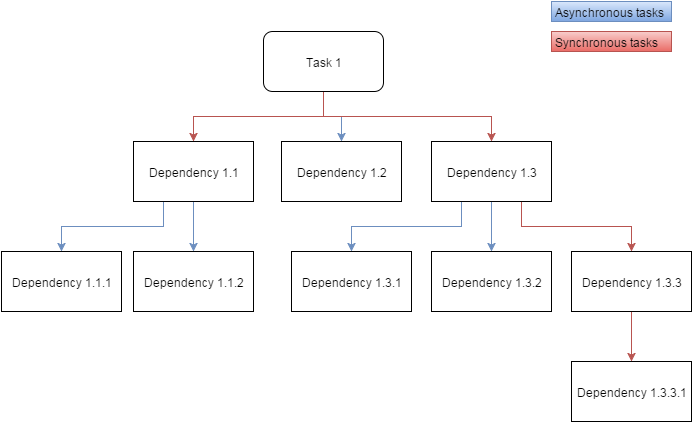
4. Task dependencies

In this step we will configure which tasks have to be executed after the current task finishes.

Playing with these options, we can create a workflow.

ElementDefinitionUse
TaskThe task to be executedRequired
BlockingDefines if the task is blocking or not. If it is, the task will be executed synchronously, and it will cancel the dependency launch stack if the task ends with an error. Otherwise, the dependency will be launched asynchronouslyRequired
OrderThe order in which the synchronous task has to be launched in the synchronous dependency stack, the asynchronous dependencies will be launched as they come, with no defined orderRequired

Go to the dependencies guide to see more about dependencies and their usage.

Note: The dependencies can also have their own dependencies to create a workflow.

5. Task report

The last step is to choose a report type.

The report will give information about the task when it finishes.

We can choose one of these four options:

1. None

Used when we don't want to retrieve any report from the task.

This could be compared to the silent-action in AWE.

2. Email

This option will send an email with the task information, and it will also add the dependencies information if any.

ElementDefinitionUse
Send in case ofSet the allowed status (task status when it finishes) for sending the emailRequired
Email serverThe email server form where the email is going to be sentRequired
Send to usersThe list of users to send the emailRequired
TitleThe title of the emailRequired
MessageThe message to be added in the emailRequired

Note: The email will also add basic information about the task itself and its dependencies.

3. Broadcast

This option will send a broadcast message with the given message to the selected users only.

ElementDefinitionUse
Send in case ofSet the allowed status (task status when it finishes) for sending the broadcastRequired
Send to usersThe list of users to send the broadcastRequired
MessageThe message to be sent in the broadcastRequired
4. Maintain

This option will launch the selected maintain as a report.

ElementDefinitionUse
Send in case ofSet the allowed status (task status when it finishes) for executing the maintainRequired
MessageThe message to be sent, it will be added to the context in order to be available for the selected maintainOptional

Note: The task data will be added to the context in order to be available for the selected maintain, to get the data, it is recommended to use the TaskConstants interface variable names from the Scheduler package.

Task management

The existing tasks can be managed from the scheduler tasks screen, where we will have a list of the created tasks.

The list will show some basic information of each task, like the name, the launch type (icon), the last and next execution times, the task status and the execution average time.

When selecting one task, some options will be activated:

OptionDefinitionMultiple
UpdateUpdate the selected taskNo
DeleteDelete the selected task/sYes
StartLaunch the selected task as a manual task. It doesn't need to be a manual task in order to launch an instance of the task manuallyNo
Activate/DeactivateActivates or Deactivates the selected task, the option changes depending on the current task statusNo

Task Schedule Configuration

One of the main features of the scheduler, is the powerful tool that allows to create any kind of schedule in a simple way.

For this purpose, and with the simplicity in mind, the schedule creation has been separated into three main schedule options:

1. Repetitive schedules

Schedules that are launched every X time. We can choose the time that has to pass between launches, and the time unit that is going to be used.

The repetitive schedule, as its name suggest, allows to create schedules that are launched every X time, where X is the time between one launch to the next one.

Depending on the time unit we choose, some other options will appear into the configuration screen to help the user to create a more advance schedule.

But first, the next fields are common for all the possible options.

OptionDefinitionUseDisables
CalendarA holiday calendar to use for the current task, the task won't be launched in the dates contained by the calendarOptionalExecution date
From ^1The start date / time for the current task scheduleOptionalNone
To ^2The end date / time for the current task scheduleOptionalNone
Repeat eachThe time that has to pass between executionsRequiredNone

^1: If the From criterion is empty, the task will be launched at the moment it's created.

^2: If the To criterion is empty, the task will be launched indefinitely until its configuration changes, or the task is removed.

1. Seconds
OptionDefinitionUseDisables
MonthsThe months that the schedule will be launch.OptionalNone
DaysThe days of the month that the schedule will be launch.OptionalDays of the week
Days of the weekThe days of the week that the schedule will be launch.OptionalDays
HoursThe hours where the schedule will be launch.OptionalNone
MinutesThe minutes where the schedule will be launch.OptionalNone
2. Minutes
OptionDefinitionUseDisables
MonthsThe months that the schedule will be launch.OptionalNone
DaysThe days of the month that the schedule will be launch.OptionalDays of the week
Days of the weekThe days of the week that the schedule will be launch.OptionalDays
HoursThe hours where the schedule will be launch.OptionalNone
3. Hours
OptionDefinitionUseDisables
MonthsThe months that the schedule will be launch.OptionalNone
DaysThe days of the month that the schedule will be launch.OptionalDays of the week
Days of the weekThe days of the week that the schedule will be launch.OptionalDays
4. Days
OptionDefinitionUseDisables
MonthsThe months that the schedule will be launch.OptionalNone
HoursThe hours where the schedule will be launch.OptionalExecution time
MinutesThe minutes where the schedule will be launch.OptionalExecution time
SecondsThe seconds where the schedule will be launch.OptionalExecution time
Execution timeThe time where the schedule will be launch.OptionalHours,Minutes,Seconds
5. Months
OptionDefinitionUseDisables
DaysThe days of the month that the schedule will be launch.OptionalDays of the week
Days of the weekThe days of the week that the schedule will be launch.OptionalDays
HoursThe hours where the schedule will be launch.OptionalExecution time
MinutesThe minutes where the schedule will be launch.OptionalExecution time
SecondsThe seconds where the schedule will be launch.OptionalExecution time
Execution timeThe time where the schedule will be launch.OptionalHours,Minutes,Seconds
6. Years
OptionDefinitionUseDisables
MonthsThe months that the schedule will be launch.OptionalNone
DaysThe days of the month that the schedule will be launch.OptionalDays of the week
Days of the weekThe days of the week that the schedule will be launch.OptionalDays
HoursThe hours where the schedule will be launch.OptionalExecution time
MinutesThe minutes where the schedule will be launch.OptionalExecution time
SecondsThe seconds where the schedule will be launch.OptionalExecution time
Execution timeThe time where the schedule will be launch.OptionalHours,Minutes,Seconds

Note: If one of the optional values inside the configuration is left empty, the default All value will be applied.

2. One time Schedules

This kind of schedule will launch a task just once.

See more about one time schedules here.

3. Custom schedules

The custom schedule allows to create every possible configuration that the Quartz Scheduler can work with. The custom schedule configuration screen uses dependencies in order to help the user with the correct creation of the schedule by enabling / disabling criterions when needed.

This schedule type launches a task only once, by creating a cron pattern with an specific date and time.

The available fields to create this kind of task are:

OptionDefinitionUseDisables
Execution dateThe launch date.RequiredNone
Execution timeThe launch time.RequiredNone

Note: At least one of the two criterions needs to be filled.

The custom schedule offers all the available fields that can be customized to create the cron pattern.

OptionDefinitionUseDisables
CalendarA holiday calendar to use for the current task, the task won't be launched in the dates contained by the calendarOptionalExecution date
From ^1The start date / time for the current task scheduleOptionalExecution date,Execution time
To ^2The end date / time for the current task scheduleOptionalExecution date,Execution time
YearsThe years that the schedule will be launch.OptionalExecution date
MonthsThe months that the schedule will be launch.OptionalExecution date
DaysThe days of the month that the schedule will be launch.OptionalExecution date,Days of the week
Days of the weekThe days of the week that the schedule will be launch.OptionalExecution date,Days
HoursThe hours where the schedule will be launch.OptionalExecution time
MinutesThe minutes where the schedule will be launch.OptionalExecution time
SecondsThe seconds where the schedule will be launch.OptionalExecution time
Execution dateThe date where the schedule will be launch.OptionalCalendar,From,To,Years,Months,Days,Days of the week
Execution timeThe time where the schedule will be launch.OptionalHours,Minutes,Seconds

^1: If the From criterion is empty, the task will be launched at the moment it's created.

^2: If the To criterion is empty, the task will be launched indefinitely until its configuration changes, or the task is removed.


Task Dependencies


Another powerful feature of the Scheduler module is the possibility of adding dependencies to a task. The dependencies are tasks that will be launched just after the parent task finishes. These dependencies can also contain other dependencies, creating a workflow.

There are two main types of dependencies.

1. Synchronous dependencies

The synchronous dependencies are, as their name suggest, executed in a synchronous way, in a configurable order.

The synchronous dependencies are created by setting the Blocking=Yes option.

By setting blocking to yes mean that, in case that any of the dependencies ends with an error, it will cancel the entire synchronous execution stack.

To manage the stack, there is the Order criterion, which is used to set the order in which the synchronous dependencies are going to be executed.

2. Asynchronous dependencies

The asynchronous dependencies are executed in bulk and their execution order can't be configured.

As the dependencies are executed in bulk, they are not blocking between them.

Dependencies configuration

The dependency configuration scree allows to create two type of dependencies, synchronous and asynchronous.

The difference between them is just that one is blocking whereas the other is not.

In order to add a task as a dependency, its launch type must be set to Manual.

ElementDefinitionUse
TaskThe task that the dependency is going to executeRequired
BlockingUsed to define if the dependency is going to be synchronous or asynchronous, and if it can cancel the synchronous dependencies execution stackRequired
OrderSynchronous dependency execution order, only needed if the Blocking option is set to Yes, otherwise it will be disabledRequired
Workflows
Workflow example

The next image shows an example on how to create a workflow using the scheduler dependencies concatenation.


Servers


The servers created for the Scheduler module are mainly used to execute tasks, and in tasks that needs to check if a file has changed.

The servers can be instantiated multiple times, and each instantiation can use its own user and password to connect to the server with the selected protocol.

Server configuration

When creating a new server, the next fields have to be filled.

ElementDefinitionUse
NameServer nameRequired
ServerServer IP addressRequired
PortServer portRequired
Type of connectionThe protocol to be used to connect to the serverRequired
ActiveServer statusRequired

Note: If a server is deactivated, the task using it won't even try to connect to it.

Server management

The scheduler server list will show a list of server with their basic information: name, server ip, connection protocol and status.

When selecting one of the servers from the list, some options will be enabled:

OptionDefinitionMultiple
UpdateUpdate the selected serverNo
DeleteDeletes the selected server/sYes
Activate / DeactivateActivates / deactivates the selected server, the label changes depending on the selected servers current statusNo

Calendars


The task inside the scheduler can be modified to ignore some dates by using holiday calendars.

Those calendars contains the dates that have to be ignored by the scheduler in the task schedule.

Each of the tasks can only be associated with one calendar.

Calendar configuration

The calendar configuration procedure consists in two steps:

1. Create calendar

The first step is to create the calendar itself, which will have the next basic information.

ElementDefinitionUse
NameThe calendar nameRequired
DescriptionThe calendar descriptionRequired
ActiveThe calendar statusRequired

Note: If the calendar status is set to Active = No the task will ignore the calendar, and it will be launch as if it wasn't associated with it.

2. Add dates

Once the calendar is created, from the calendar configuration screen, we can add new dates by selecting the option edit on the top right side of the screen.

When we get to the edition screen we will have to fill the next fields for each date.

ElementDefinitionUse
DateThe date to add to the calendarRequired
NameA name to assign to the date, for example, a holiday nameOptional

Calendar management

On the calendar list screen, when selecting one of them, the next options will be available:

OptionDefinitionMultiple
EditRedirects to the edition screen where we can change the calendar data, and add/remove/update calendar datesNo
DeleteDelete calendar and all its associated datesYes
Activate/DeactivateActivates / deactivates the selected calendar, the label changes depending on the selected calendars current statusNo