Default screens
Introduction
AWE has some pre-designed common screens which are very useful for a first version of an application. This way you have already implemented user and profile management, some useful themes to customize the application, security management like access control and screen configuration, and some higher level management like database, module and site configuration, and the sequences and application parameters of the application.
AWE also can visualize an auto-generated help screen based on the screen definition and some extra help and help-image
attributes. This help screen can be generated by screen or there is also an application help screen
which has documentation about the full application (based on the menu).
Users
The Users option of the menu opens the user administration screen (user-admin): one screen to find the users
who can access the application, review them, edit them and run the security tasks. It shows the users in a grid with
their avatar, name, login and email, profile, state and two-factor state, with a search by name, login, email or
profile and quick filters with their counts (All, Locked, Without 2FA, Inactive). Each row has an edit button
and a menu (edit, unlock, reset the two-factor, delete), and the selected rows show a bar with their actions (reset the
two-factor, delete). A side panel creates and edits a user, grouped in sections (identity, access, sign-in security,
appearance and output), and shows the avatar, name and state of the user being edited.
The Additional profiles column of the grid shows the additional profiles of each user as tags: the first two, and a +N tag whose tooltip lists the others.
The side panel has an Additional profiles criterion, a multiple selection of the profiles the user has besides the main one. Saving the user replaces its additional profiles, the main profile is never stored as an additional one, and deleting a user or a profile deletes its additional profile rows. See Additional profiles.
View permissions, in the menu of a row and in the panel of a user being edited, opens the Permissions tab of the
access control window with that user: the permissions of its main and additional profiles. It shows the saved
profiles, so the button of the panel is disabled while the main profile is changed; save the changes first. It needs
users.read and permissions.read, and it opens the screen-access option of the menu.
The screen reuses the queries and maintains of the users (UsrLst, UsrNew, UsrUpd, UsrDel, reset2fa), so an
application that overrides them keeps its logic. Unlocking uses the UsrUnl maintain, which also audits the change.
The previous user screens (Usr, UsrNew, UsrUpd and UsrViw) are deprecated since AWE 5.0.0 and will be removed in
the next minor release (5.1.0). Point your own menu options to the user-admin screen; see the
v5 migration guide.

Profiles
The Profiles option of the menu opens the profile administration screen (profile-admin), built like the
users one: the profiles group users in security categories, like administrators, regular users or special
users, and give them a default theme, an initial screen and a file restriction. It shows the profiles in a grid with
their avatar, name, acronym and theme, initial screen, file restriction and state, with a search by name, acronym, theme
or initial screen and quick filters with their counts (All, Active, Inactive). Each row has an edit button and a
menu (edit, delete), and the selected rows show a bar to delete them. A side panel creates and edits a profile, grouped
in sections (identity, defaults and access), and shows the avatar, name and state of the profile being edited.
The screen reuses the queries and maintains of the profiles (ProLst, ProNew, ProUpd, ProDel and the
check-profile-acronym check of a new acronym), so an application that overrides them keeps its logic.
The Permissions field of the side panel gives permissions to the profile, grouped by resource; the changes apply at the next sign-in of its users. The predefined profiles Reader and Contributor open read-only, and Duplicate profile creates an editable copy of any profile with its permissions. See The Profiles screen and Predefined profiles.
The previous profile screens (Prf, PrfNew, PrfUpd and PrfViw) are deprecated since AWE 5.0.0 and will be
removed in the next minor release (5.1.0). Point your own menu options to the profile-admin screen; see the
v5 migration guide.

Themes
The Themes option of the menu opens the theme administration screen (theme-admin), built like the users
one: it defines the themes of the application. Each theme has a name, a primary and a surface (a palette from a list
or, with the custom option, a hex from a colour picker) and a mode. It shows the themes in a grid with their avatar,
name, primary · surface (the palette or the hex), mode and state, with a search by name, primary or surface and quick
filters with their counts (All, Active, Inactive). Each row has an edit button and a menu (edit, delete), and the
selected rows show a bar to delete them. A side panel creates and edits a theme, grouped in sections (identity, colours
and mode, preview), and shows the avatar, name, colours and state of the theme being edited. A new theme starts with the
emerald primary, the automatic surface and the system mode, and is active; the Active switch is shown when editing a
theme. See Theme configuration.
The Preview section shows a sample of the theme (a page, a card, text with a link, a tag, a field and the buttons) with the colours and the mode of the panel, updated as they change and before the theme is saved, also for custom hex colours. In the system mode a switch shows the sample in the light or the dark mode. An empty or invalid hex keeps the last valid preview. The preview never changes the theme of the application, so cancelling the panel leaves no trace (see Theme preview).
The screen reuses the queries and maintains of the themes (ThmLst, ThmNew, ThmUpd and ThmDel, which compose the
colours with the composeThemeColors service), so an application that overrides them keeps its logic. The preview reads
the palette of a custom hex from the ThmPrvPal query (service themePreviewPalette).
The previous theme screens (Thm, ThmNew, ThmUpd and ThmViw) are deprecated since AWE 5.0.0 and will be removed
in the next minor release (5.1.0). Point your own menu options to the theme-admin screen; see the
v5 migration guide.

The AWE 4 Theme customization screen is removed in AWE 5 (see the v5 migration guide).
Each user switches between the light and dark modes with the mode button on the navigation bar.
The navigation bar buttons are defined on the info-buttons.xml screen.
Here you have the themeModeSelector and the themeSelector.
Sites
The Sites option of the menu opens the site administration screen (site-admin), built like the users one:
a site separates the logic of the application, each one with its own databases, and it fixes which database uses each
module on that site. It shows the sites in a grid with their avatar, name, order and state, with a search by name and
quick filters with their counts (All, Active, Inactive). Each row has an edit button and a menu (edit, duplicate,
delete), and the selected rows show a bar to delete them.
A side panel creates and edits a site, grouped in sections (identity and the modules and databases of the site), and
shows the avatar, name and state of the site being edited. The grid of modules and databases is inside the panel: its
rows (module, database and order) are edited in place, and Save changes (or Create site) saves the site and its rows
with one maintain. The panel is 640 pixels wide, in pixels because the root font size is 10px in the AngularJS client and
13px in React, so a max-width in rem would render a different panel in each one; the three columns of the grid fit in
those 640 pixels.
The screen reuses the queries and maintains of the sites (SitLst, SitStaCnt, QryLstModDbsBySitAdm, SitNew,
SitUpd, SitDel and SitNamUni), so an application that overrides them keeps its logic. SitUpd takes the site of
each row of the modules grid from the row itself (IdeSitRow), so saving a site without changing its rows works, and
SitNew reads the order of the new site from OrdCrt.
When the child grid of a side panel fits in it (a few narrow columns), keep it inside the panel as this screen does: one overlay and one save. When it is too wide, use the pattern of the databases screen: a read-only list in the panel and the editable grid in a wide dialog over it.
The previous site screens (Sit, SitNew, SitUpd and SitViw) are deprecated since AWE 5.0.0 and will be removed in
the next minor release (5.1.0). Point your own menu options to the site-admin screen; see the
v5 migration guide.
Modules
A module is a special set of options defined on the menu which can be used to separate functionalities inside an application. A user can only have an active module at a time, so when the module is changed, menu options will be refreshed with common and module options.
The Modules option of the menu opens the module administration screen (module-admin), built like the
sites one. It shows the modules in a grid with their avatar, name and initial screen, the number of profiles,
users and sites, order and state, with a search by name and quick filters with their counts (All, Active,
Inactive). Each row has an edit button and a menu (edit, duplicate, delete), and the selected rows show a bar to delete
them.
A 640 pixels side panel creates and edits a module in three tabs, and always opens on the first one:
- General: the module, chosen among the modules declared in the menu, its initial screen, its order in the module selector and whether it is active.
- Access: the profiles whose users can enter the module and, besides them, the users that can enter it. A user can select a module when it is assigned to the user or to the profile of the user.
- Sites and databases: the database the module uses on each site. These are the same rows the sites screen edits from the site, so a change in one screen shows in the other.
The three grids are editable inside the panel, and Save changes (or Create module) saves the module and its rows with
one maintain (ModUpd or ModNew), even when a tab was never opened. The list uses ModLstAdm, the quick filters
ModStaCnt, and a name that is already taken is refused (ModNamUni).
The screen has no theme: the theme of a module and the theme of a user in a module were stored but never applied, because
the theme of a user comes from the user and, when it has none, from the profile. The IdeThm fields of ModNew and
ModUpd are optional, so saving a module without a theme keeps the stored one.
When a side panel holds several child grids, split them in tabs as this screen does: each tab fits the panel without scrolling and the grids of the tabs that were not opened are still sent on save. An empty required field opens its tab and marks it; a grid row still being edited blocks the save with a warning, but does not open its tab yet (#918).
The previous module screens (Mod, ModNew, ModUpd and ModViw) are deprecated since AWE 5.0.0 and will be removed in
the next minor release (5.1.0). Point your own menu options to the module-admin screen; see the
v5 migration guide.
Databases
The Databases option of the menu opens the database administration screen (database-admin), built like the
users one: it manages the connections to datasources of any supported database type, like Oracle, SQL Server,
H2, etc. It shows the connections in a grid with their avatar, alias and description, environment, database type
and state, with a search by alias, description, connection or user and quick filters with their counts
(All, Active, Inactive). Each row has an edit button and a menu (edit, delete), and the selected rows show a bar
to delete them. A side panel creates and edits a connection, grouped in sections (connection, credentials, description
and the sites and modules that use it), and shows the avatar, alias, connection and state of the connection being
edited. The stored password is never shown: when editing, it only changes if a new one is typed. After
saving or deleting a connection the database selector of the application is reloaded.
The sites and modules of a connection are a child grid, too wide for the side panel: the panel lists them read-only (site, module and order) and its Edit sites and modules button opens a wide dialog over the panel with the editable grid. Done goes back to the panel, which then lists the changes, and Save changes (or Create connection) saves the connection and its sites and modules together. Use the same pattern for the child grids of your own side panels:
- Put the editable grid in a
<dialog>withstyle="modal-lg"after the<side-panel>in the screen, so it opens on top of the panel. Both grids stay in the screen, so the maintain of the panel still receives the rows of the editable grid. - Show a read-only grid in the panel (
show-toolbar="false",pagination-disabled="true", columns withsendable="false"and their own names, as the names of the columns of a screen are unique), filled with thecopy-rowsaction:<button-action type="copy-rows" target="ReadOnlyGrid" value="EditableGrid"/>. Its shown columns take, in order, the cells of the shown columns of the editable grid. - Run
copy-rowsafter loading or resetting the editable grid when the panel opens, and after thedialogaction of the button that opens the dialog: that action waits until the dialog is closed (with Done, its close button or Esc).
The screen reuses the queries and maintains of the connections (DbsLst, DbsNew, DbsUpd, DbsDel, DbsAlsUni and
QryLstSitModByDbs), so an application that overrides them keeps its logic.
The previous database screens (Dbs, DbsNew, DbsUpd and DbsViw) are deprecated since AWE 5.0.0 and will be
removed in the next minor release (5.1.0). Point your own menu options to the database-admin screen; see the
v5 migration guide.
Mail servers
The Mail servers option of the menu opens the mail server administration screen (email-server-admin), built like the
databases one: it holds the external mail servers used to send e-mail in some parts of the application,
like print screens and scheduler reports. It shows the servers in a grid with their alias (and the host under it), port,
security, user, authentication and state, with a search by alias and quick filters with their counts (All, Active,
Inactive). Each row has an edit button and a menu (edit, duplicate, delete), and the selected rows show a bar to delete
them.
A side panel creates and edits a server, grouped in sections (identity: alias and the Active select; connection: host, port and security; authentication: its type, the user or sender mailbox, the password and the OAuth2 client registration) and shows the alias and the state of the server being edited. The stored password is never shown: when editing, it only changes if a new one is typed. Duplicate opens the panel as a new server with the values of the selected one, without its password, and the alias of a server is unique.
The screen reads the mail server queries and maintains of the framework (EmlSrvLst, EmlSrvNew, EmlSrvUpd,
EmlSrvDel, EmlSrvNamUni and EmlSrvOauRegLst) and adds EmlSrvStaCnt, EmlSrvStaCntAct and EmlSrvStaCntIna for
the counts of the quick filters, so an application that overrides them keeps its logic. The mail senders read the
servers, with their encrypted password, from the server-only query EmlSrvSndLst: EmlSrvLst never returns the
password.
Each mail server defines:
| Field | Description |
|---|---|
| Alias | Server name (up to 100 characters). Users and emails refer to the server by this name. |
| Server | SMTP host. |
| Port | SMTP port. Leave it empty to use the default port of the security mode. |
| Security | Connection security: None, STARTTLS or SSL/TLS. |
| Authentication | None, User and password or OAuth2. |
| User / Sender mailbox | User for user and password authentication, or sender mailbox for OAuth2: the label of the field follows the authentication type. |
| Password | Only for user and password authentication. It is stored encrypted. When editing, leave it empty to keep the current value. |
| OAuth2 client registration | Only for OAuth2 authentication, and required: the Spring Security client registration that provides the access token. |
Changes made on this screen are applied to the mail senders right away; there is no need to restart the application.
The previous mail server screens (EmlSrv, EmlSrvNew and EmlSrvUpd) are deprecated since AWE 5.0.0 and will be
removed in the next minor release (5.1.0). Point your own menu options to the email-server-admin screen; see the
v5 migration guide.
Default sender and mail servers
awe.mail.enabled=trueturns on every mail feature. Without it the application sends no mail at all, not even through the servers of this screen.- The default sender is configured with the
awe.mail.*properties (notspring.mail.*). - To send a message, AWE takes the mail server of the sending user (the user of the
SESSION_USERparameter when the send carries it, otherwise the user of the session): the mail server assigned to that user in the users screen. If the user has no server, or the server is not defined here, the message is sent through the default sender. - A mail server that cannot be read (for instance a stored value that is not valid) is left out, with an error naming the server in the log: the other servers keep working and the users of that server send through the default sender.
- A mail server with OAuth2 that is read but misconfigured (no TLS, no sender mailbox, unknown registration) never falls back to the default sender: its messages fail.
Both the mail servers of this screen and the default sender can authenticate with OAuth2: see OAuth2 authentication.
Security mode and port
| Security | JavaMail properties | Default port |
|---|---|---|
None | Plain connection | 25 |
STARTTLS | mail.smtp.starttls.enable=true and mail.smtp.starttls.required=true: the connection is upgraded to TLS and fails if the server does not support it | 587 |
SSL/TLS | mail.smtp.ssl.enable=true: TLS from the start (implicit TLS) | 465 |
A port typed on the screen always takes precedence over the default port.
Authentication types
- None: the server accepts messages without authentication (for example, an internal relay).
- User and password: SMTP AUTH with the user and the password of the server. The password is decrypted right before it is sent to the SMTP server.
- OAuth2: SASL
XOAUTH2with the sender mailbox and an OAuth2 access token instead of a password. See OAuth2 authentication.
Amazon SES example
Amazon SES uses user and password authentication with the SMTP credentials created in the SES console (they are not the IAM access keys):
| Field | Value |
|---|---|
| Server | email-smtp.[REGION].amazonaws.com |
| Port | 587 (or empty) |
| Security | STARTTLS |
| Authentication | User and password |
| User / Sender mailbox | SES SMTP user name |
| Password | SES SMTP password |
OAuth2 authentication
A mail server of this screen, or the default sender, can authenticate with OAuth2 instead of a user and a password. Microsoft is disabling SMTP AUTH with user and password (basic authentication) in Exchange Online, and OAuth2 is the replacement. To set it up:
- Prepare the provider: an application that obtains tokens with the
client_credentialsgrant and may send from the sender mailbox (see the Microsoft 365 example). - Declare that application as a Spring Security client registration.
- Use the registration in a mail server of this screen or in the default sender.
- Send a message and read the log if it fails (see Troubleshooting).
How it works
- Before each SMTP connection, AWE asks Spring Security (
OAuth2AuthorizedClientManagerwith theclient_credentialsprovider) for an access token of the client registration. There is no user interaction: the application authenticates itself with its client id and client secret. - AWE connects to the SMTP server with TLS (
STARTTLSorSSL/TLS) and authenticates with SASLXOAUTH2: the user is the sender mailbox and the password is the access token, sent as aBearertoken. - The message is sent from the sender mailbox.
| Topic | Behaviour |
|---|---|
| Token cache | AWE keeps one token per mail server in memory (the default sender counts as one more server, awe.mail). Spring Security reuses it and requests a new one when it is about to expire (less than 60 seconds left). |
| Rejected token | When the SMTP server rejects the authentication, the cached token is discarded: that message fails and the next send requests a new token. |
| Token endpoint | Requests to the token endpoint have a 10 second connect timeout and a 30 second read timeout. |
| TLS | Required: the access token is a credential and is never sent over a plain connection. Without STARTTLS or SSL/TLS nothing is sent and no token is requested. |
| No fallback | A mail server or default sender with OAuth2 that cannot authenticate never falls back to another server, nor to user and password: its messages fail. |
| Login | client_credentials registrations are never offered as login options: single sign-on only uses authorization_code registrations, so a mail registration can live next to the SSO ones. |
| Without OAuth2 | An application without any OAuth2 client registration keeps sending mail with the None and User and password servers; the registration list of the side panel is empty. |
| Secrets | The database stores only the registration id: the token URL, the client id and the client secret stay in the application configuration. Logs and errors name the server and the registration, never the secret or the token. |
| Providers | Any provider whose token endpoint supports the client_credentials grant and whose SMTP server accepts those tokens with XOAUTH2. The refresh_token grant, Google Workspace service accounts (JWT bearer) and OAUTHBEARER are not supported. |
Microsoft 365 example
On the Microsoft side:
- Register an application in Microsoft Entra ID and create a client secret. Write down the directory (tenant) id, the application (client) id and the secret value.
- Add the
SMTP.SendAsAppapplication permission (Office 365 Exchange Online) and grant admin consent. - Register the service principal of the application in Exchange Online (Exchange Online PowerShell), with the object
id of the enterprise application:
New-ServicePrincipal -AppId [APPLICATION_ID] -ObjectId [ENTERPRISE_APPLICATION_OBJECT_ID]. - Allow the application to send from the sender mailbox:
Add-MailboxPermission -Identity "noreply@contoso.com" -User [SERVICE_PRINCIPAL_ID] -AccessRights FullAccess. - Make sure SMTP AUTH is enabled on the sender mailbox:
Set-CASMailbox -Identity "noreply@contoso.com" -SmtpClientAuthenticationDisabled $false.
See Authenticate an IMAP, POP or SMTP connection using OAuth for the details of the Microsoft configuration.
The AWE side of this example is the office365-mail registration of the next section, used by a
mail server or by the default sender.
Client registration
Define a Spring Security client registration with authorization-grant-type=client_credentials and its provider
(token-uri, or issuer-uri to discover it) in the application properties. The registration id is the name the mail
server or the default sender refers to:
spring.security.oauth2.client.registration.[REGISTRATION_ID].authorization-grant-type=client_credentials
spring.security.oauth2.client.registration.[REGISTRATION_ID].client-id=[CLIENT_ID]
spring.security.oauth2.client.registration.[REGISTRATION_ID].client-secret=[CLIENT_SECRET]
spring.security.oauth2.client.registration.[REGISTRATION_ID].scope=[SCOPE]
# Provider: the token endpoint, or the issuer to discover it
spring.security.oauth2.client.provider.[REGISTRATION_ID].token-uri=[TOKEN_URI]
#spring.security.oauth2.client.provider.[REGISTRATION_ID].issuer-uri=[ISSUER_URI]
With the values of the Microsoft 365 example:
spring.security.oauth2.client.registration.office365-mail.authorization-grant-type=client_credentials
spring.security.oauth2.client.registration.office365-mail.client-id=[APPLICATION_ID]
spring.security.oauth2.client.registration.office365-mail.client-secret=[CLIENT_SECRET]
spring.security.oauth2.client.registration.office365-mail.scope=https://outlook.office365.com/.default
spring.security.oauth2.client.provider.office365-mail.token-uri=https://login.microsoftonline.com/[TENANT_ID]/oauth2/v2.0/token
Registrations are read at startup: restart the application after adding or changing one.
Mail server with OAuth2
Create (or edit) the mail server in the side panel and select OAuth2 as the authentication: the User field becomes
Sender mailbox and the OAuth2 client registration select appears, listing only the client_credentials
registrations. When the security is None, the panel switches it to STARTTLS. With the Microsoft 365 registration:
| Field | Value |
|---|---|
| Server | smtp.office365.com |
| Port | 587 (or empty) |
| Security | STARTTLS |
| Authentication | OAuth2 |
| Sender mailbox | The mailbox that sends the messages, for example noreply@contoso.com |
| OAuth2 client registration | office365-mail |
Then select the server in the E-mail server field of the users that must send through it, in the users screen. The other users keep sending through the default sender (see Default sender and mail servers).
Default sender with OAuth2
The default sender authenticates with OAuth2 when
awe.mail.oauth2-registration names a client_credentials client
registration. awe.mail.user is the sender mailbox, awe.mail.pass and awe.mail.auth are not used, and
awe.mail.tls=true (STARTTLS, required) or awe.mail.ssl=true is mandatory. With the Microsoft 365 registration:
awe.mail.enabled=true
awe.mail.host=smtp.office365.com
awe.mail.port=587
awe.mail.tls=true
awe.mail.user=noreply@contoso.com
awe.mail.oauth2-registration=office365-mail
If TLS/SSL or the user are missing, or the registration does not exist or is not client_credentials, an error naming
the property and the registration is logged at startup, the application starts, and every message of the default
sender fails with an authentication error: no token is requested and no message leaves without OAuth2. Without
awe.mail.oauth2-registration the default sender works as before.
Troubleshooting
AWE writes these errors to the application log, and the send that hits them fails with an authentication error. The
mail servers of this screen are checked when they are loaded (on the first send and after a change on this screen) and
on each send; the default sender is checked at startup and on each send. <server> is the alias of the mail server, or
awe.mail for the default sender, and <id> is the registration id.
| Message | Meaning and fix |
|---|---|
Email server '<server>' uses OAuth2 authentication without STARTTLS or SSL | The security is None. Select STARTTLS or SSL/TLS; for the default sender, set awe.mail.tls=true or awe.mail.ssl=true. |
awe.mail.oauth2-registration '<id>' needs awe.mail.tls=true or awe.mail.ssl=true: every email of the default sender fails | Startup error of the default sender: same fix. |
Email server '<server>' uses OAuth2 authentication without a sender mailbox | The mail server has no sender mailbox: type it in the side panel. |
awe.mail.oauth2-registration '<id>' needs awe.mail.user (sender mailbox): every email of the default sender fails | Startup error of the default sender: set awe.mail.user. |
Email server '<server>' uses an unknown OAuth2 client registration '<id>' | There is no spring.security.oauth2.client.registration.<id>.* with that id: check the spelling and that the properties reach the application. |
Email server '<server>' uses OAuth2 client registration '<id>', which is not client_credentials | The registration has another grant (for example the authorization_code of the login): define a separate registration with authorization-grant-type=client_credentials. |
awe.mail.oauth2-registration '<id>' cannot be used: <message> | Startup error of the default sender; <message> is one of the two previous errors. |
Email server '<server>' could not obtain an OAuth2 access token from registration '<id>' (<code>) | The token endpoint did not return a token. <code> is the OAuth2 error of the provider (see below). Nothing is sent to the SMTP server. |
SMTP 535 answer (Microsoft 365: 535 5.7.3 Authentication unsuccessful) | AWE obtained a token but the SMTP server refused it for the sender mailbox. Check the SMTP.SendAsApp permission and its admin consent, the service principal, the mailbox permission of that exact mailbox, and that SMTP AUTH is enabled on it. The token is discarded, so the next send requests a new one. |
<code> | Usual cause |
|---|---|
invalid_client, unauthorized_client | Wrong client id or client secret (an Entra ID client secret expires), or the application does not belong to the tenant of the token-uri. |
invalid_scope | The provider does not accept the scope. For Microsoft 365 it is https://outlook.office365.com/.default. |
invalid_token_response | No valid token answer: the token endpoint cannot be reached, it did not answer within the timeouts, the token-uri is wrong, or the answer is not an OAuth2 token response. |
no access token | The token endpoint answered without an access token. |
Upgrading
The Flyway migration AWE_V1.2.3__Email_server_settings (every supported database) widens the server name (100), the
user (255) and the password (512) columns of AweEmlSrv and HISAweEmlSrv, and adds the SecMod (security mode) and
OauReg (OAuth2 client registration) columns. Existing servers keep working as before: no security mode means None,
no port means 25, and the authentication values 0 (none) and 1 (user and password) do not change; 2 is OAuth2.
In previous versions the password saved through this screen reached the SMTP server encrypted, so servers with user and password authentication could not authenticate. The password is now decrypted before it is sent, and those servers authenticate correctly. A password that cannot be decrypted (for example, one inserted in plain text directly in the database) is used as stored.
Message queues
The Message queues option of the menu opens the message queue administration screen (queue-admin), built like the
databases one: it holds the JMS queues that the application uses to communicate with a broker, and each
entry is the queue definition that the Queues.xml file can use. It shows the queues in a
grid with their alias (and the description under it), destination, queue type, broker and state, with a search by alias
and quick filters with their counts (All, Active, Inactive). Each row has an edit button and a menu (edit,
duplicate, delete), and the selected rows show a bar to delete them.
A side panel creates and edits a queue, grouped in sections (identity: alias, description and the Active select; queue: queue type, destination and connection type; connection: broker, user and password) and shows the state of the queue being edited. The user and the password of the broker only apply to a remote connection: with a JNDI connection they are disabled and cleared. The stored password is never shown: when editing, it only changes if a new one is typed.
The screen reads the queue queries and maintains of the framework (QueLst, QueNew, QueUpd, QueDel and
QueAlsUni) and adds QueStaCnt, QueStaCntAct and QueStaCntIna for the counts of the quick filters, so an
application that overrides them keeps its logic.
The previous queue screens (Que, QueNew and QueUpd) are deprecated since AWE 5.0.0 and will be removed in the next
minor release (5.1.0). Point your own menu options to the queue-admin screen; see the
v5 migration guide.
Sequences
The Sequences option of the menu opens the sequence administration screen (sequence-admin), built like the
users one. A sequence is a name with a value that AWE adds up and hands out as the next identifier of a new
record, as an autonumeric field would: it is very useful for old database models without autonumeric fields. The screen
shows the sequences in a grid with their name, value and state, with a search by name and quick filters with their
counts (All, Active, Inactive). Each row has an edit button and a menu (edit, delete), and the selected rows show
a bar to delete them.
A side panel creates and edits a sequence: its name, its state and its value, with a hint of what the value means. The name of a sequence is its primary key, so the panel shows it read-only when editing: type it when the sequence is created.
It reuses the queries of the sequences (AweKeyLst, AweKeySug) and adds the maintains AweKeyNew, AweKeyUpd and
AweKeyDel, which work on one sequence each (AweKeyUpd takes the sequence of the selected row from
KeyNam.selected), so the editable grid of the previous screen and its multiple maintain are no longer used. The
multiple maintain keeps working for the deprecated screen as AweKeyMul.
The previous sequence screen (AweKey) is deprecated since AWE 5.0.0 and will be removed in the next minor release
(5.1.0). Point your own menu options to the sequence-admin screen; see the v5 migration guide.
Application parameters
The Application parameters option of the menu opens the application parameter administration screen
(application-parameter-admin), built like the sequences one. Application parameters are a sort of extra
application properties which can override the ones defined on the application.properties file, an extra layer to
improve application customization. The screen shows the parameters in a grid with their name and description, value,
category (General, Security or Reports) and state, with a search by name or description and quick filters with
their counts (All, Active, Inactive). Each row has an edit button and a menu (edit, delete), and the selected rows
show a bar to delete them.
A side panel creates and edits a parameter: its name, its category and its state, and its value and description. The name of a parameter is the key the application reads, so the panel shows it read-only when editing. Saving a parameter reloads the properties of the application, so the new value is in effect without restarting it.
It reuses the queries of the parameters (AweAppParLst, AweAppParSug) and adds the maintains AweAppParNew,
AweAppParUpd and AweAppParDel, which work on one parameter each (AweAppParUpd takes the parameter of the selected
row from IdeAweAppPar.selected), so the editable grid of the previous screen and its multiple maintain are no longer
used. The multiple maintain keeps working for the deprecated screen as AweAppParMul.
The previous application parameter screen (AweAppPar) is deprecated since AWE 5.0.0 and will be removed in the next
minor release (5.1.0). Point your own menu options to the application-parameter-admin screen; see the
v5 migration guide.
Broadcasting
This screen is simply a way to send messages to all connected users inside the application, or a specific message to a single user.
It will appear as a message in the top side of the screen.
Log
The log screen contains access to all the application logs. This will be deprecated soon in order to give way to new observability stack in a distributed architecture.
Access control
The Access control option of the Security menu opens the access control window (access-admin): one screen that answers, for a
profile or a user, what they can open in the private menu and why, and lets a functional administrator change it.
An auditor reads the same screen without changing anything.
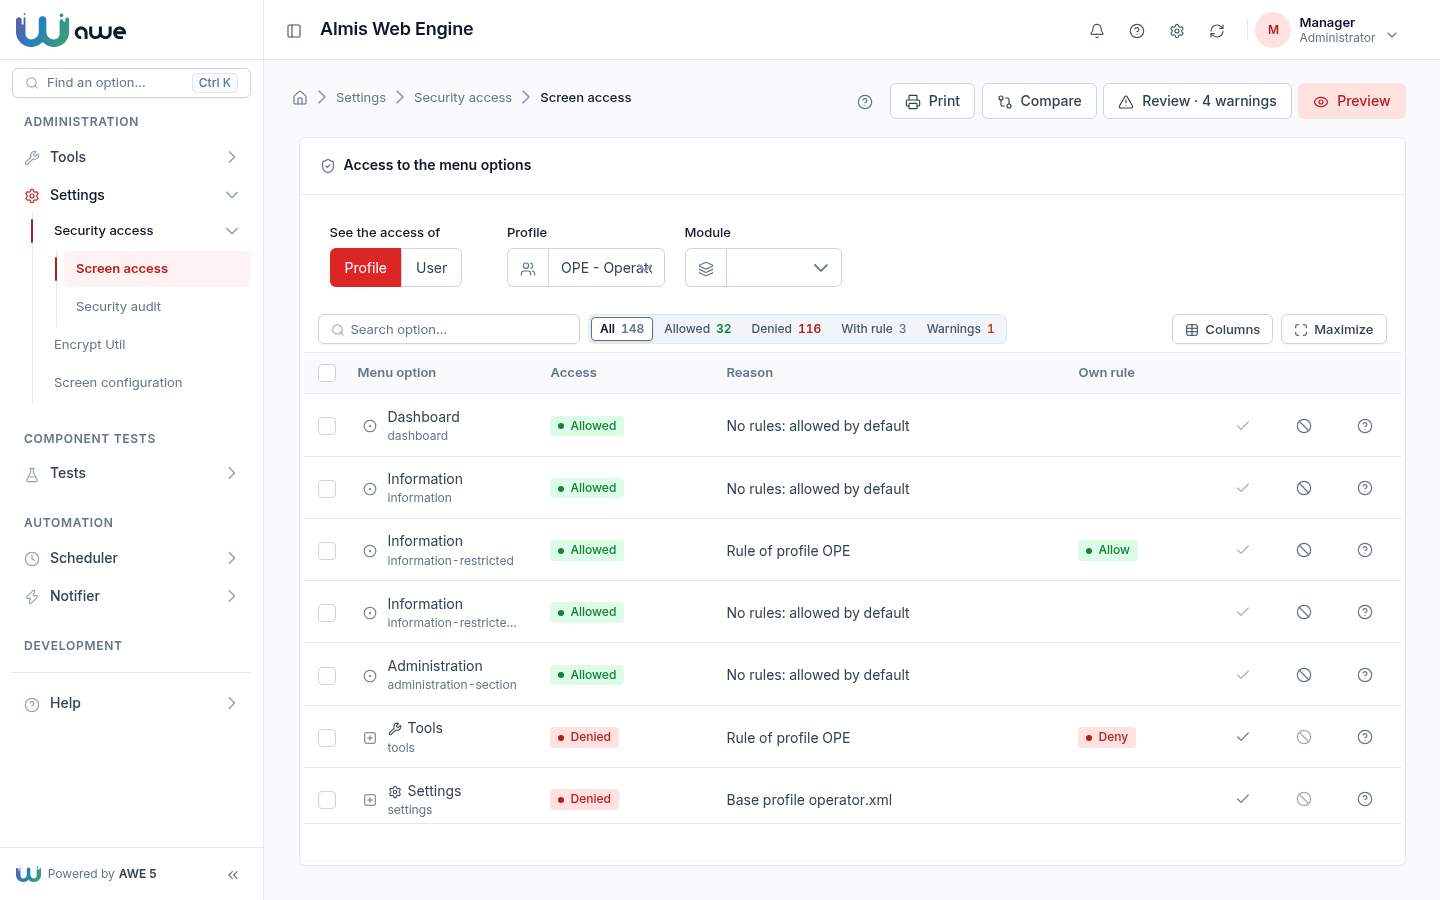
Quick path
- In See the access of, choose Profile or User, then the profile or the user in the suggest beside it. Optionally choose a module. These fields share one row at the top of the screen, above its two tabs: Menu options (the tree) and Permissions.
- Read the tree: each option of the private menu with its access and the reason.
- Press Why? on an option to see the layer that decides it, and Allow or Deny to change it.
Read the tree
The tree is the whole private menu (menu/private.xml) of the application. Each option shows:
| Column | What it says |
|---|---|
| Menu option | The label and, under it, the name of the option in private.xml. |
| Access | Allowed or Denied: what the profile or the user gets in the real menu. |
| Reason | The layer that decides the access: no rules (allowed by default), the base profile file, the module, a global rule, a profile rule, a user rule or a rule inherited from a parent option. |
| Own rule | The rule of the chosen profile or user on that option (Allow or Deny), if any. |
| Warnings | Under the reason: allowed, but its parent is denied (the option cannot be reached from the menu) or redundant rule (removing it does not change the access without module nor in any module of the menu). |
The search finds options by label or name, and the quick filters show their counts: All, Allowed, Denied, With rule and Warnings. A matching option keeps its parent options in the tree, so it never shows alone.
With a module chosen, the options of other modules are denied with the reason Belongs to module ..., as in the real menu of a user who works in that module. Without a module, only the rules decide.
Allow or deny an option
The Allow and Deny buttons of a row store a rule of the chosen profile or user on that option. A rule on an option also applies to the options under it. The menu of the connected users is refreshed after the change. A button that would change nothing is disabled: Allow on an allowed option, Deny on a denied one.
To change several options at once, check their rows: a bar shows Allow, Deny and Remove rule. With one row checked, the bar disables the same buttons as the row, and Remove rule is only enabled when the option has an own rule. With several rows checked, the three buttons are enabled and the preview tells which options change. Before anything is stored, a preview dialog lists the options whose access changes (today, after the change and what decides today) and the users of the profile that lose or gain access, including the ones that keep it through their own rule. Its buttons stay at the bottom while the lists scroll. Cancel stores nothing.
Why panel
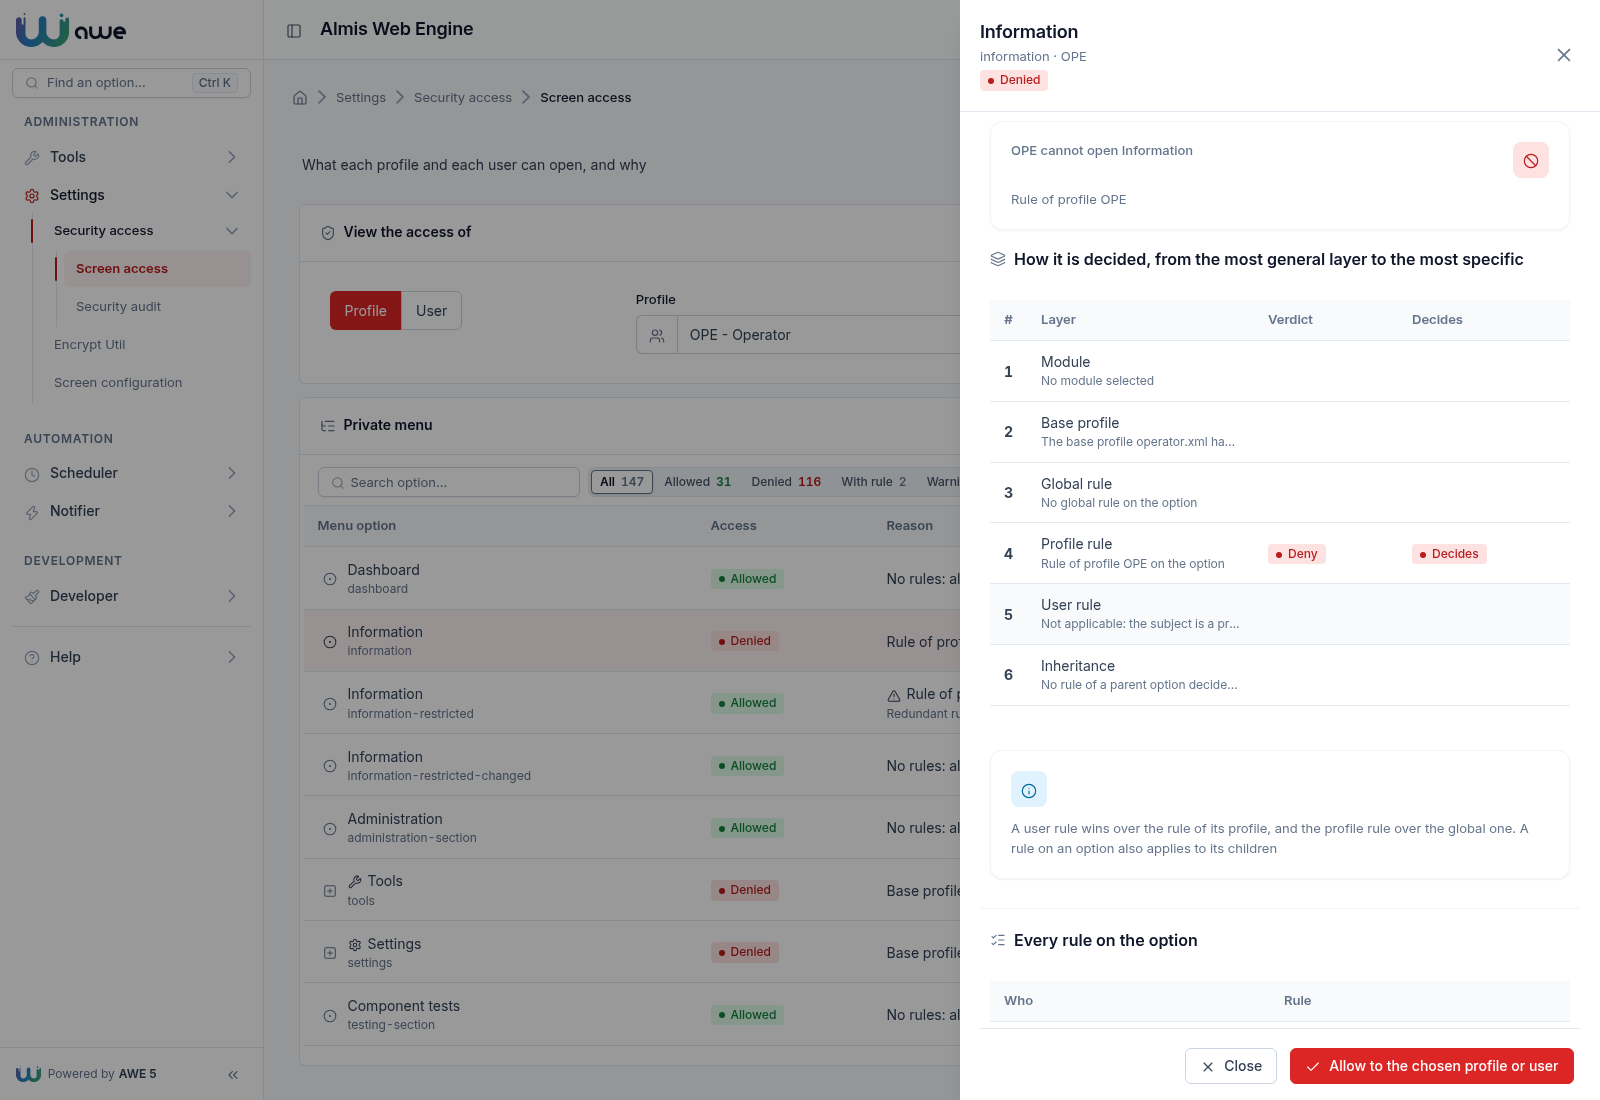
Why? opens a side panel with the result (OPE cannot open Information) and the cascade that decides it, from the most general layer to the most specific one:
- Module: an option of another module than the chosen one is denied.
- Base profile: the restriction file of the user or of its profile (
profile/<name>.xml; when neither sets one,awe.security.default-restriction,generalby default). - Global rule: a rule for every user.
- Profile rule: a rule of the profile (of the user's profile, for a user).
- User rule: a rule of the user.
- Inheritance: a rule on a parent option applies to its children.
The last layer with a rule wins, and the panel marks it with Decides. So a user rule wins over the rule of its profile, and a profile rule over a global one. The access shown is computed with the same cascade as the menu of a signed-in user, so the screen never contradicts the real menu.
The panel also lists every rule on the option, of any profile or user, where each rule can be switched (Allow ↔ Deny) or removed. Removing a rule asks for confirmation, because it may belong to another profile or user.
Compare
Compare adds Compare with to the row of the subject, with a reminder beside it: one suggest that searches profiles and users at once and lists them grouped under Profile and User (in the React client, its arrow lists all of them). The tree gets two more columns, the access in the comparison and why it changes, and the Only differences quick filter.
- A profile simulates the subject with that profile: a profile against another one, or a user with another profile, keeping the user's own rules.
- A user compares with the real access of that user: its own profile and its own rules.
Nothing is stored: Stop comparing goes back to the normal view. To give that profile to the user, use the users screen.
Review
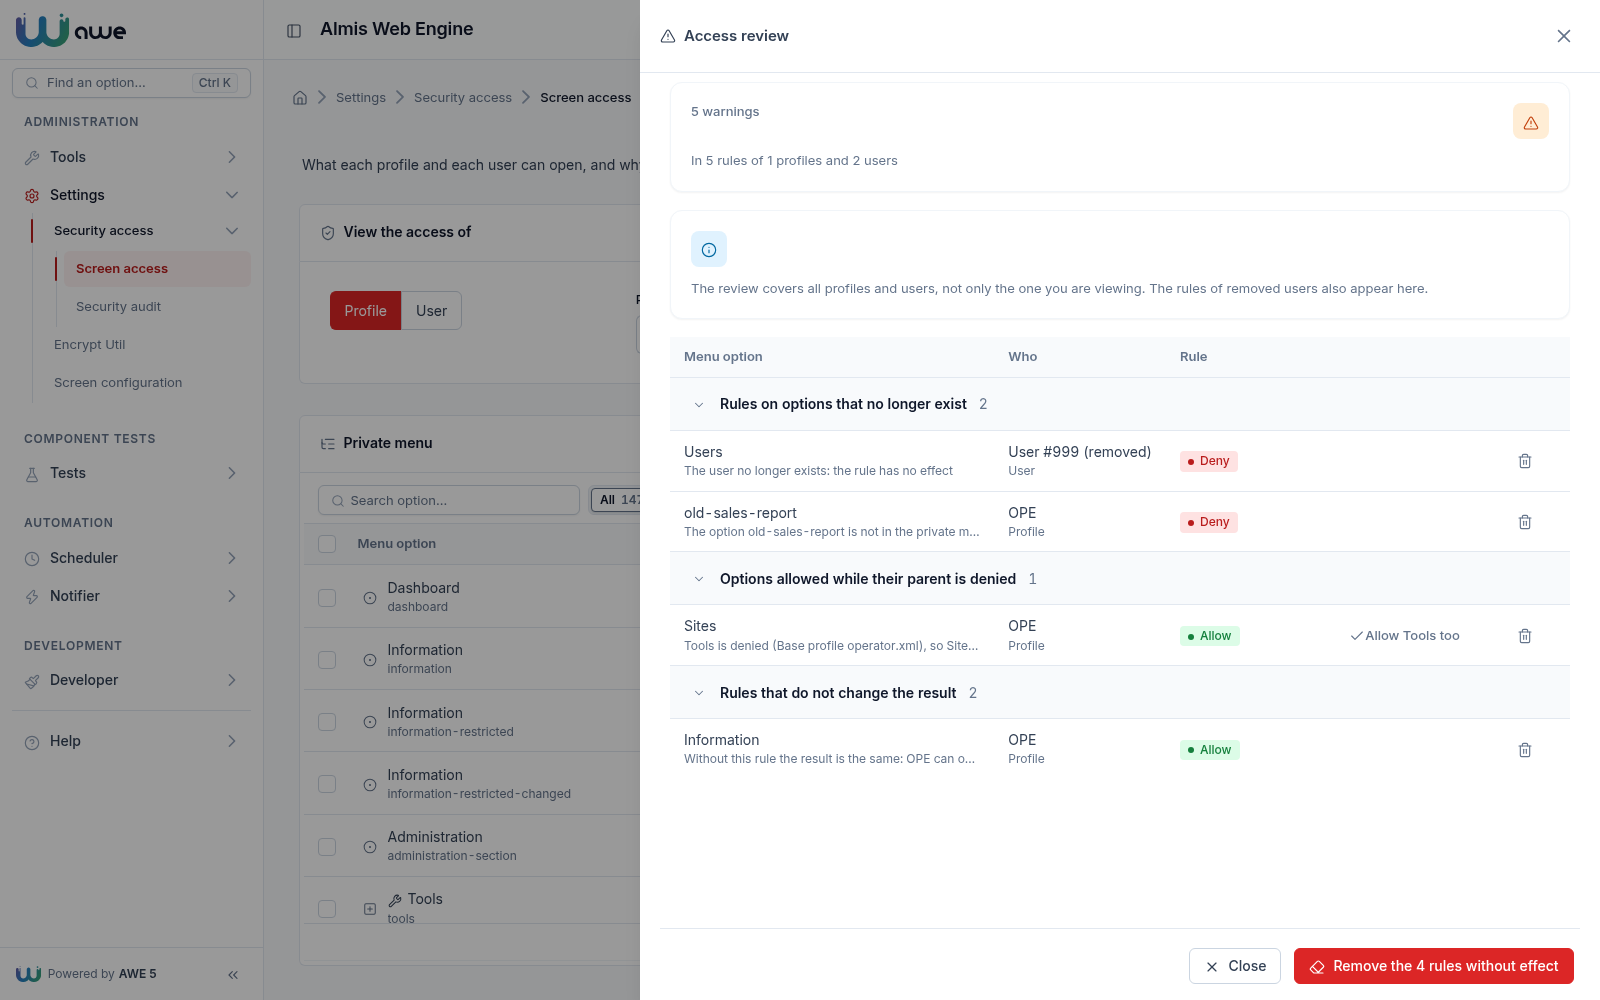
Review shows the number of warnings and opens a side panel that checks the rules of all profiles and users, not only the chosen one. Each finding has its fix:
| Finding | Fix |
|---|---|
Rules on options that no longer exist in private.xml, or of a profile or user that was removed | Remove the rule. |
| Options allowed while their parent is denied (they do not appear in the menu) | Allow the parent option too, or remove the rule. |
| Rules that do not change the result (without module nor in any module) | Remove the rule, one by one or all at once with Remove the rules without effect. A rule that only matters inside a module is not listed. |
Preview
Preview opens a preview of the menu that the chosen profile or user sees in the chosen module: the options they can reach, how many are hidden and the reason of each hidden one. It is only a preview: it does not sign in as the user nor open their screens.
Permissions
The Permissions tab shows, for the same profile or user, what it can do: every permission of the catalog (the
Permissions.xml of AWE, its modules and the application), grouped by resource, with its state and where it comes from.
For a user, the permissions are those of its main profile plus those of its additional profiles.
| Column | What it says |
|---|---|
| Permission | The verb or the action and, under it, its identifier (users.update). The group of each resource tells how many of its permissions are granted. |
| State | Granted or Not granted. |
| Origin | One chip per origin: the profile and the entry of its profile file (MGR · file manager (*)), the profile and its assignment (MGR · assignment users.*), or Granted always for a resource declared granted="always" in the catalog (also the ones of the application). |
| Warning | A profile file excludes the permission but another origin grants it, or the exclusion that leaves it out. |
The search finds permissions by identifier or label, also of their resource, and the quick filters count All, Granted, Not granted and Warnings. The card above the grid sums it up: how many permissions are granted, the profiles of the user and the warnings.
The permissions of a profile are its profile file minus its exclusions, plus its assignments (Profiles screen); see Effective permissions. An exclusion only subtracts inside its own profile file: it is no denial, so an assignment or another profile can still grant the permission. Why? opens a side panel with what each profile gives to the permission: its profile file, its assignments and its verdict, and the catalog for a permission granted always.
Compare works in this tab too: the grid shows the state of the other user or profile and why it changes, with the Only differences quick filter. The other counts are still the ones of the chosen subject. A profile is compared with its own permissions, and a user with the permissions of all its profiles.
View permissions in the Users screen opens this tab with the user already chosen. Until a user or a profile is chosen, the summary card is hidden.
The tab shows the configured state: the permissions are loaded at sign-in, so a change applies at the next sign-in
of each user (the help of the grid says so). It does not change anything, and it requires users.read and permissions.read. The module, Review and
Preview belong to the menu options and are hidden in this tab.
Access that travels with the application
The rules of this screen are data of each environment: they are stored in the database and point at the option
names of the private.xml of the application. That is why there is no import or export of rules: the options of one
application do not exist in another one.
- Access that must be the same in every environment, and that ships with the application, goes in the base restriction
files of the profiles (
profile/<name>.xml, with<restriction option="..."/>entries). The screen shows them as the Base profile layer. - For an audit, Print exports the tree with the access and the reason of each option (see the print engine).
The previous access screens ScrAccRes (Screen access), menu-access and screen-access are deprecated since AWE
5.0.0 and will be removed in the next minor release (5.1.0). The screen-access option of the default menu and of the
archetypes now opens access-admin. Point your own menu options to the access-admin screen; see the
v5 migration guide. The rules they stored are the same ones, so nothing has to be migrated.
Encrypt util
This option is very useful to generate encrypted values or properties. Simply put on the text you want to encrypt
on the Text criterion and push the Encrypt button. You will have filled the Encrypted text with the
text you need to add in database encrypted columns and the Encrypted property which is the encrypted text to be used
in application.properties file values.
The Password hash field shows the text hashed with the algorithm selected in Password algorithm, in the format
stored in ope.l1_pas. Use it to write scripts that insert users: the value goes as is into ope.l1_pas.
| Password algorithm | Result |
|---|---|
| BCrypt | {bcrypt}$2a$... (68 characters). BCrypt hashes are salted, so each click gives a different hash, and all of them validate the same password |
| RIPEMD-160 (AWE 4) | The AWE 4 hash, 40 hexadecimal characters without prefix, for databases or systems that still need it |
The configured algorithm (awe.security.password-encoder) is selected by default. The Phrase key does not change the
password hash.

Screen configuration
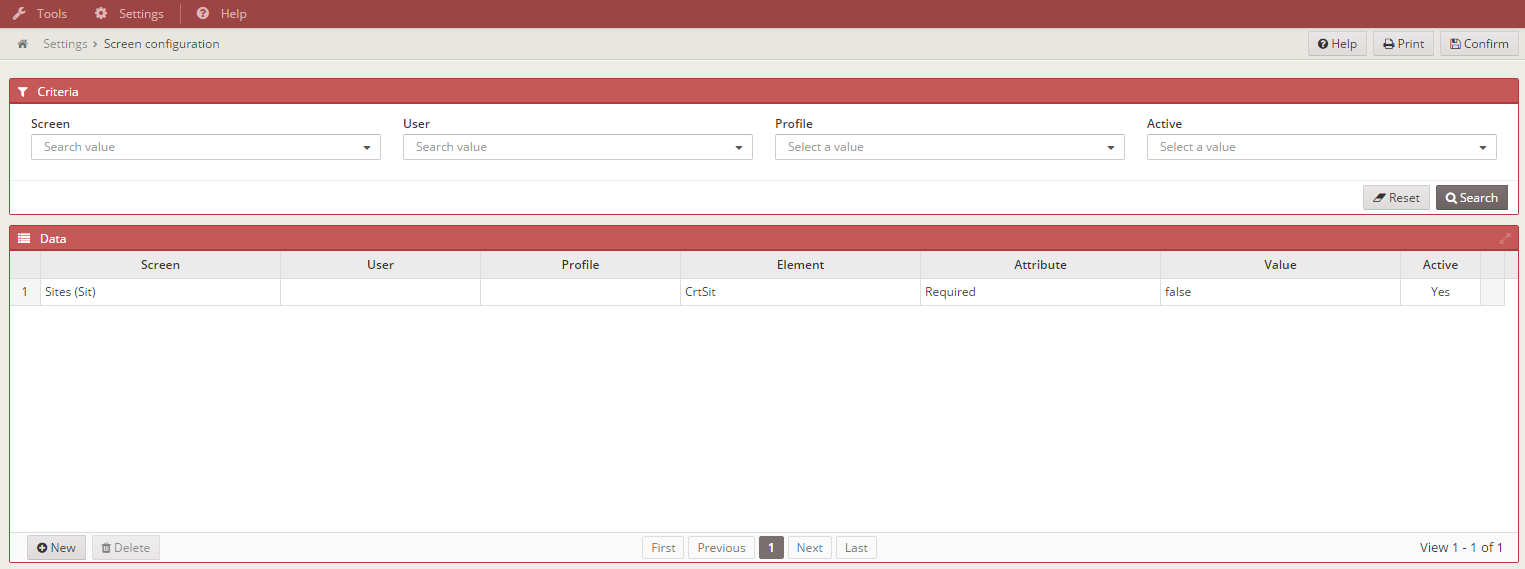
This screen allows to change the functionality of the screen defined in XML file. The new functionality is stored in the database, and it can be restricted by user or profile. To change a screen element you only have to define the screen, the element to be restricted/modified and the attribute with the new values.
Example:
If we have a criteria that will be required validation="required".
<criteria id="CrtSit" label="PARAMETER_NAME" component="suggest" server-action="data" target-action="SitSug" style="col-xs-7 col-sm-6 col-lg-3" validation="required"/>
And we want to be not required, put the new configuration like in the picture below:
For a visual editor with validation, an overview, history and export/import, see Screen personalization.
How to use it:
If you want to access and use this screen, put the next option in your private.xml or public.xml.
<option name="screen_configuration" label="MENU_TOOLS_SCR_CNF" screen="ScrCnf" icon="laptop" />
User manual
This option allows the user to access a PDF file defined on the application, as a user manual. This PDF file can be defined in some languages
Application help
